
目次
概要
こんにちは、テクニカルサポートの牛山です。
前回、AWS AmplifyとAmazon Pinpointを使ってReactベースの静的ページをデプロイし、ページに対してユーザの行動分析をおこなう回の1記事で違うサービスの解説をしようと思っていましたが、解析処理について詳しくかくことができなかったので今回はここに焦点をあてていきます。
前置き
AWS AMPLIFYとAMAZON PINPOINTを使ってWEBサイトをデプロイし解析設定をしてみる
↑
前回の記事です。
今回の記事は、前回の続きではなく、違うスターターキットをベースに筆者が改造した環境でおこないます。
実装するに当たってまったくの所見だと、フォルダー構成の意味等が分からなくなりますので、Gatsby.jsのghostベースフレームワークでブログ投稿などしている方が対象となります。
それでは実際に実装していきましょう。
手順
現在の状態を確認
Category項目に、 「Auth」 と 「Analytics」 が存在しないことを確認します。
[dev_user@dev Blog]$ amplify status
Scanning for plugins...
Plugin scan successful

Current Environment: pro

| Category | Resource name  | Operation | Provider plugin   |
| -------- | -------------- | --------- | ----------------- |
| Hosting  | amplifyhosting | No Change | awscloudformation |

Amplify hosting urls:
┌──────────────┬──────────────────────────────────────────┐
│ FrontEnd Env │ Domain                                   │
├──────────────┼──────────────────────────────────────────┤
│ pro          │ https://pro.******** │
│              ├──────────────────────────────────────────┤
│              │ https://blog.********         │
└──────────────┴──────────────────────────────────────────┘
APPに解析ライブラリを追加
それぞれ下記内容きかれるので適宜選択および入力します。
-
? Select an Analytics provider
- Amazon Pinpoint を選択。
-
? Provide your pinpoint resource name:
- アプリ名を入力(なんでもよい)
-
? Apps need authorization to send analytics events. ... {略}
- Y を入力
[dev_user@dev Blog]$ amplify add analytics
   ╭─────────────────────────────────────────────╮
   │                                             │
   │      Update available 4.29.1 → 4.29.2       │
   │   Run npm i -g @aws-amplify/cli to update   │
   │                                             │
   ╰─────────────────────────────────────────────╯

? Select an Analytics provider Amazon Pinpoint
? Provide your pinpoint resource name: Blog
Adding analytics would add the Auth category to the project if not already added.
? Apps need authorization to send analytics events. Do you want to allow guests and unauthenticated users to send analytics events? (we recommend you allow this when getting started
) Yes
Successfully added auth resource locally.
Successfully added resource Blog locally

Some next steps:
"amplify push" builds all of your local backend resources and provisions them in the cloud
"amplify publish" builds all your local backend and front-end resources (if you have hosting category added) and provisions them in the cloud
追加したライブラリをAWS側へpushします。
正常に完了すると「./src/aws-exports.js」等のフォルダーへファイルが生成されます。
※生成先は「amplify init」コマンド実施に指定した「Source Directory Path」となります。
[dev_user@dev Blog]$ amplify push
✔ Successfully pulled backend environment pro from the cloud.
Current Environment: pro
| Category | Resource name | Operation | Provider plugin |
| --------- | --------------- | --------- | ----------------- |
| Auth | cognitoce97dbf0 | Create | awscloudformation |
| Analytics | Blog | Create | awscloudformation |
| Hosting | amplifyhosting | No Change | awscloudformation |
? Are you sure you want to continue? Yes
⠹ Updating resources in the cloud. This may take a few minutes...
UPDATE_IN_PROGRESS amplify-blog-pro-133841 AWS::CloudFormation::Stack Wed Sep 23 2020 02:06:59 GMT+0900 (日本標準時) User Initiated
⠼ Updating resources in the cloud. This may take a few minutes...
・
・[中略]
・
UPDATE_COMPLETE amplify-blog-pro-133841 AWS::CloudFormation::Stack Wed Sep 23 2020 02:10:17 GMT+0900 (日本標準時)
UPDATE_COMPLETE hostingamplifyhosting AWS::CloudFormation::Stack Wed Sep 23 2020 02:10:17 GMT+0900 (日本標準時)
UPDATE_COMPLETE_CLEANUP_IN_PROGRESS amplify-blog-pro-133841 AWS::CloudFormation::Stack Wed Sep 23 2020 02:10:15 GMT+0900 (日本標準時)
✔ All resources are updated in the cloud
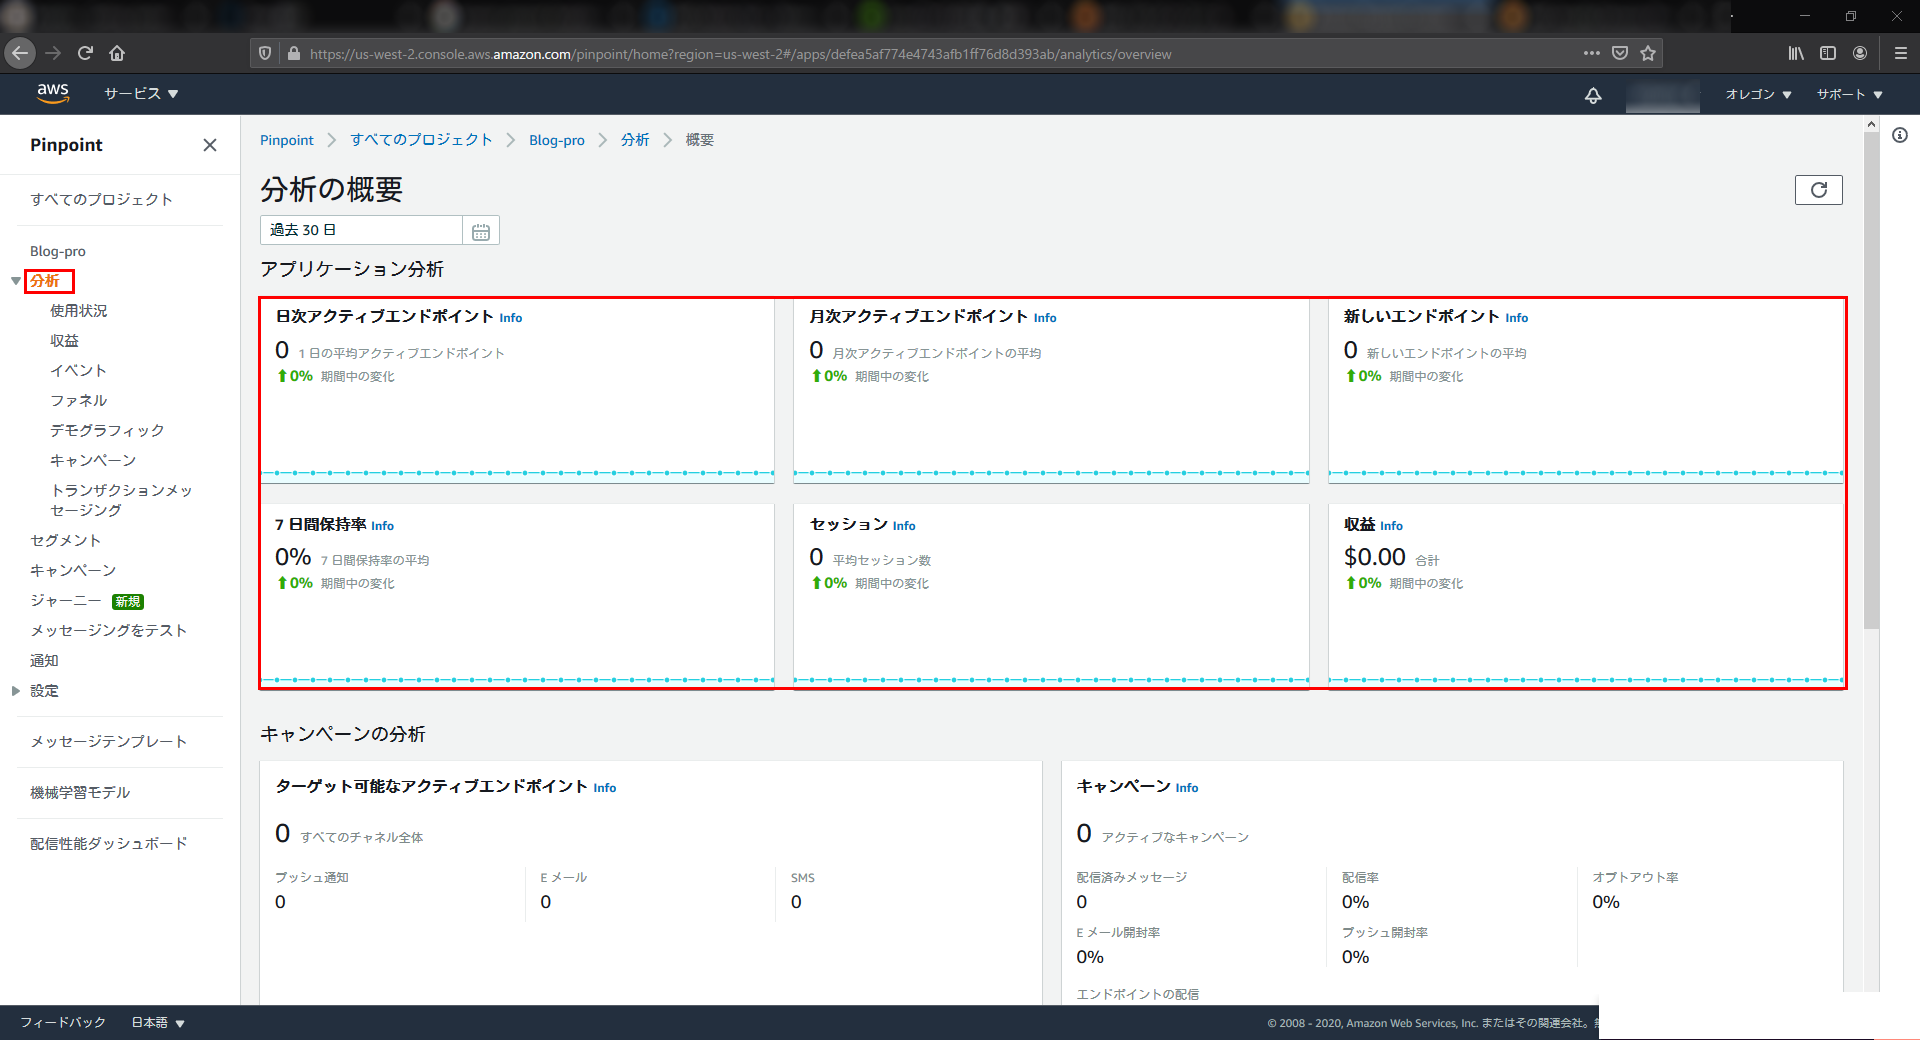
Pinpoint URL to track events https://us-******Pinpoint URL to track events の先にURLが表示されますのでリンクをコピーしブラウザの検索欄に貼り付けてください。
遷移すると下記のように何も記録されていない状態となっています。
解析処理の追加
ここでの解析処理は下記リンク先のフレームワークのフォルダー構成に準じます。
Gatsby Starter Ghost
※一部フォルダーやディレクトリはビルド時にできるものがありますのでこの限りではありません。
筆者、都合上、名称等変更している箇所がございます。
aws-exports.jsの変更
ファイル名:aws-exports.ts ⇒ aws-exports.ts へ変更。
記述内容の下記内容へ変更
/* eslint-disable */
// WARNING: DO NOT EDIT. This file is automatically generated by AWS Amplify. It will be overwritten.

/** ここから */
export interface awsmobile {
    aws_project_region: string;
    aws_cognito_identity_pool_id: string;
    aws_cognito_region: string;
    oauth: any;
    aws_mobile_analytics_app_id: string;
    aws_mobile_analytics_app_region: string;
}
/** ここまで追加 */

const config: awsmobile = { // ← 追加
    /** ここから */
    "aws_project_region": "{記載のものを使用}",
    "aws_cognito_identity_pool_id": "{記載のものを使用}",
    "aws_cognito_region": "{記載のものを使用}",
    "oauth": {},
    "aws_mobile_analytics_app_id": "{記載のものを使用}",
    "aws_mobile_analytics_app_region": "{記載のものを使用}"
    /** ここまで既存の記述内容を使用*/
}; // ← 追加

export default config; // config へ変更
aws-exports.ts の位置
Blog
├─ .circleci
│   └─ config.yml
│
├─ src
│   ├─ aws-exports.ts
初期化処理
初期化処理は、アプリケーションのルートエントリーポイント等に追加します。
例:main.ts や main.js など・・・
筆者の場合、 SiteNav.tsx に対して下記初期化処理を追記しました。
初期化処理が走ると自動的にセッションが開始され Amazon Pinpoint に記録されるようになります。
※追記箇所はどこでも良いです。
追記場所に迷う場合には毎回、処理が呼び出される場所へ記述するようにします。
import Amplify from 'aws-amplify';
import awsconfig from '../../aws-exports';
Amplify.configure(awsconfig);
SiteNav.tsx の位置
Blog
├─ .circleci
│   └─ config.yml
│
├─ src
│   ├─ components
│   │   ├─ header
│   │   │   ├─ SiteNav.tsx
イベント記録処理
template フォルダー配下にある post.tsx 記事表示テンプレートへ下記イベント記録処理を追記します。
ここでは、「show_post」という イベント名 に対して、attributes(属性)に 記事タイトルと記事URL を付加して Amazon Pinpoint へ記録するようにしています。
import { Analytics } from 'aws-amplify';
・
・[中略]
・
const PageTemplate = ({ data, pageContext, location }: PageTemplateProps) => {
・
・[中略]
・
 /** ここから */
  const shareUrl = location.href;

  void Analytics.record({
    name: 'show_post',
    attributes: { viewTitle: post.frontmatter.title, url: shareUrl },
  });
 /** ここまで追加 */

  return (
    <IndexLayout className="post-template">
・
・[略]
・
post.tsx の位置
Blog
├─ .circleci
│   └─ config.yml
│
├─ src
│   │
│   ├─ templates
│   │   ├─ post.tsx
ビルドおよび実行
下記コマンドをコンソール上で、実行し、「 http://localhost:8000/ 」にアクセスします。
投稿記事のリンクをクリックするとヘッダー情報に下記のようにでます。
npm run clean
npm run lint:fix
npm run start
アクセスしてブラウザの開発者ツールで確認するとステータスが正常で、ブログ記事名と記事URLが出力されていることが確認できます。
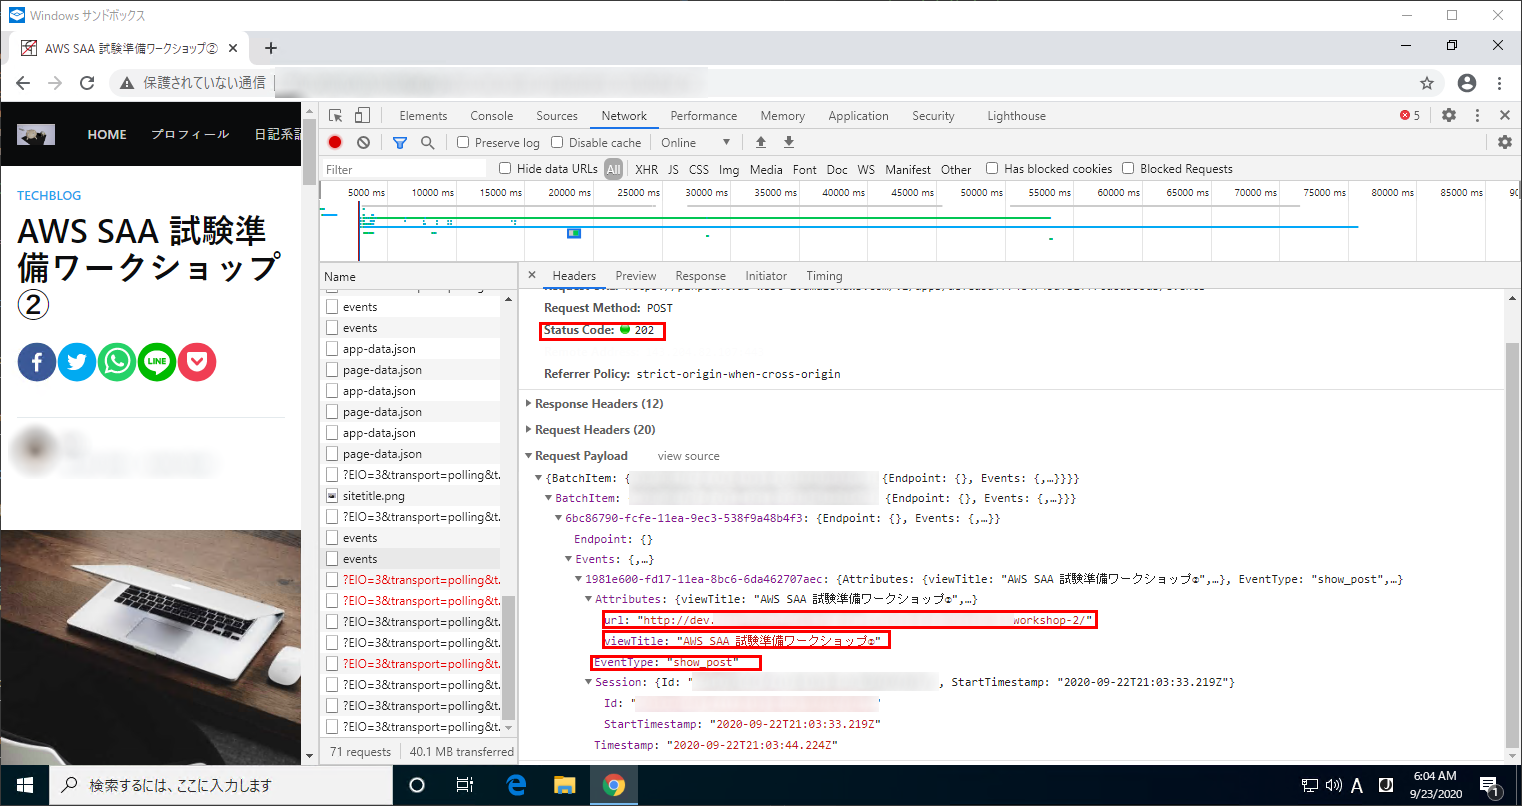
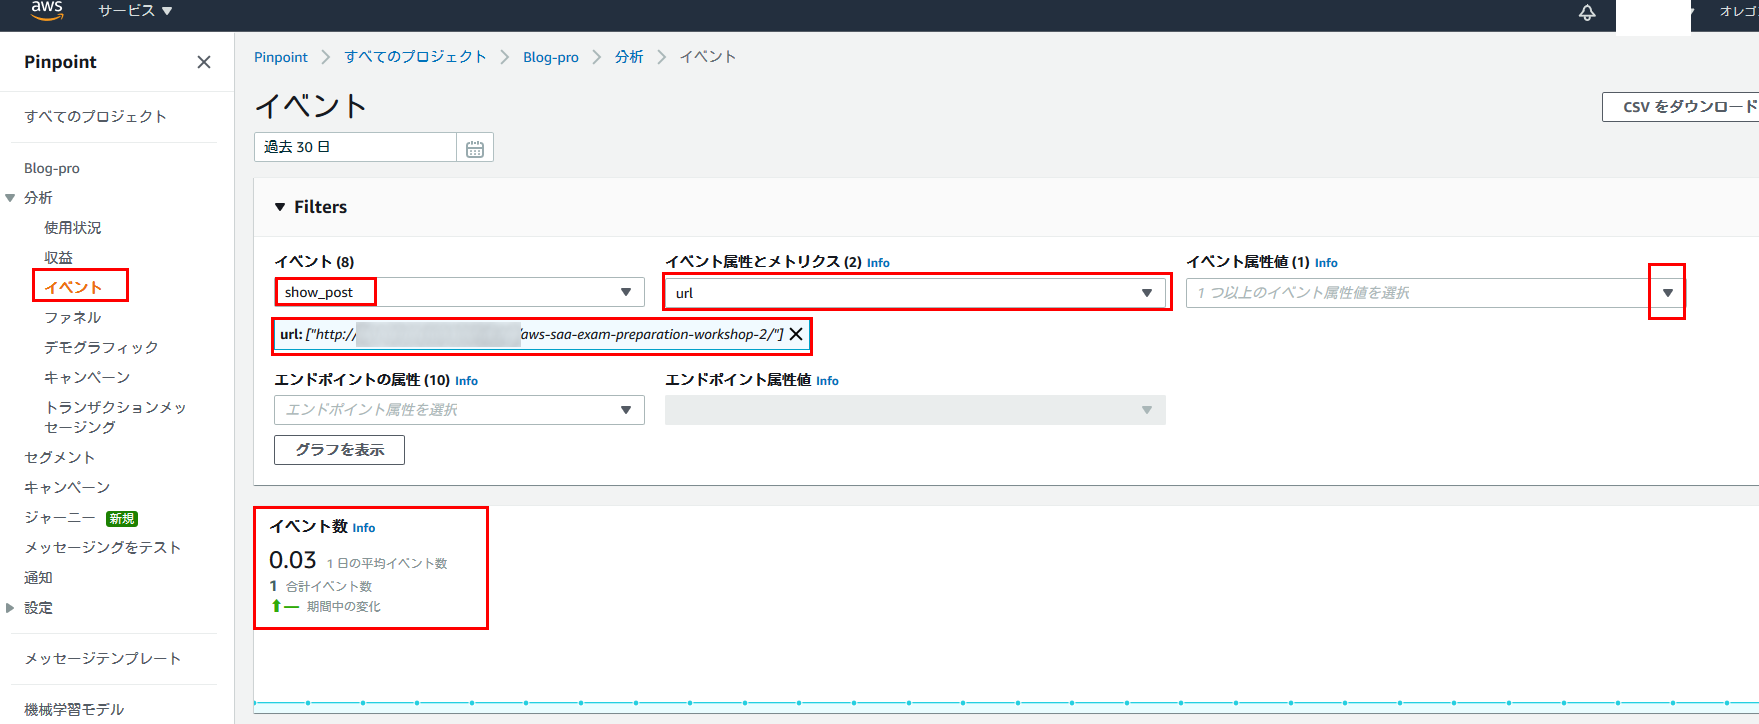
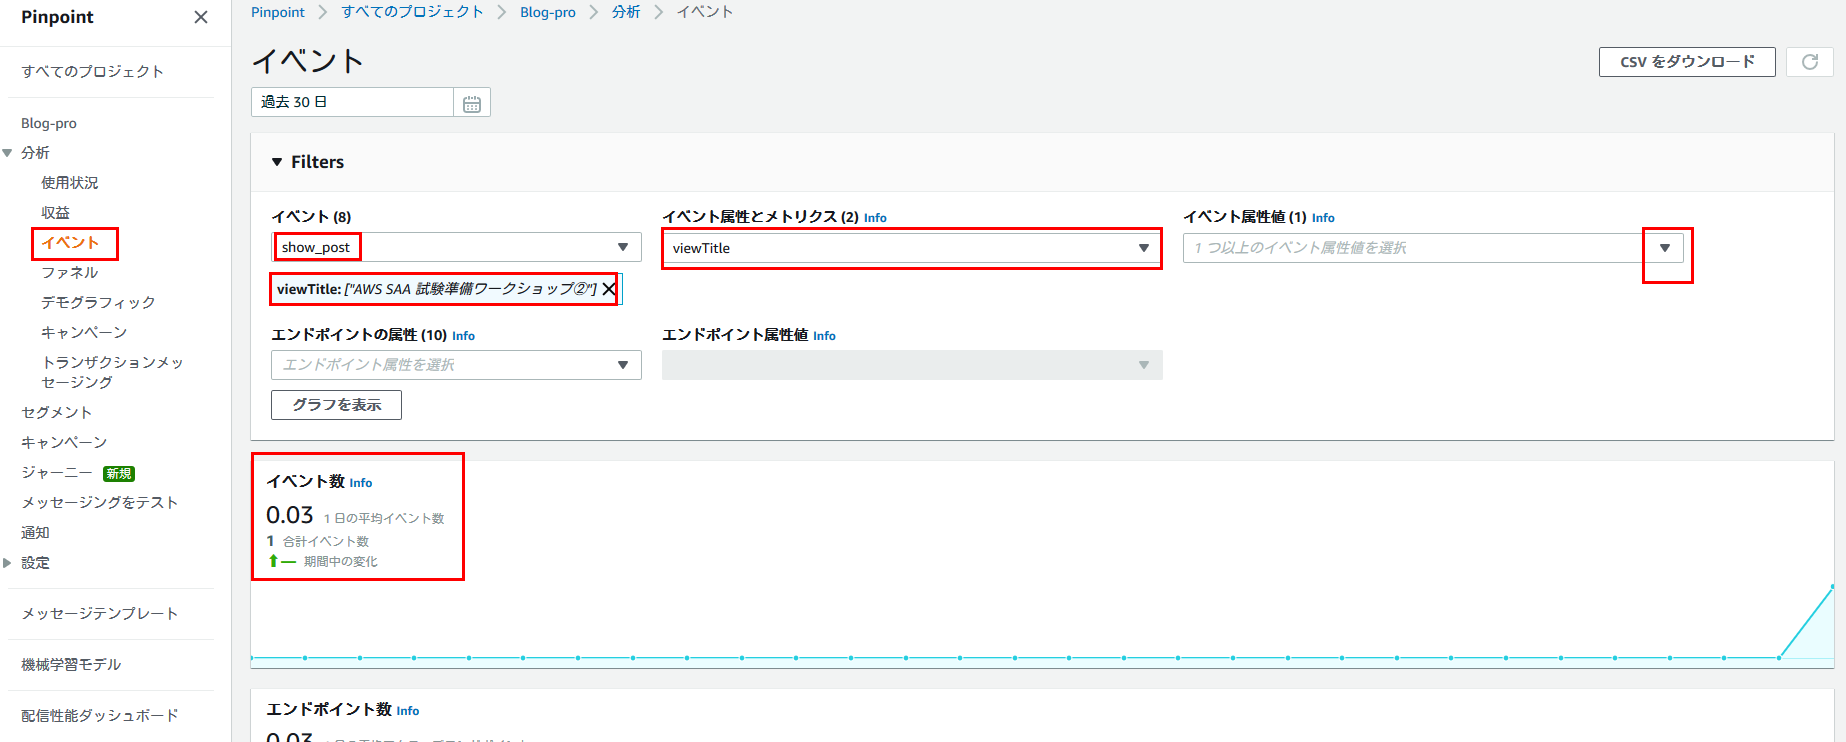
実際に上記結果が Amazon Pinpoint 側で反映されていることが下記画像から分かります。
※反映までに1時間程度掛かる場合がございます。
まとめ
実際に自分で実装してみると分からないことだらけで理解するまでに時間が掛かりましたが期待した通りに動作した瞬間の快感がとてもいいと思う筆者です。
解析設定の仕方に困っている方の一助となれば幸いです。

プロフィール
AWSの設計・構築をメインにおこなっています。
運用・保守をおこなう部署におりましたが、最近、アーキテクト課に異動しました。
日々精進しております。