
目次
概要
こんにちは、テクニカルサポートの牛山です。
今回は、Terraformと呼ばれるHashiCorp社が提供している「Infrastructure as Code」を実現するためのツールを用いてAWS上に「単一EC2インスタンス上でWordPressの構築」をやってみたいと思います。
前置き
本題へ入る前にまず、今回使用するTerraformについて概要程度に説明します。
| ツール名 | 概要 |
|---|---|
| Terraform | HashiCorp社より提供されているオープンソースのインフラ構成を宣言型コードで管理するDevOpsツールとなります。 書いたコードを適用する先の事をプロバイダと呼び、aws・azure・gcp等の各種クラウドに対応しており、かつ、それぞれで専用の構文が用意されています。 通常、AWS純正ツールであるAWS SDKを使用する場合、SDKコードに煩わされたり、背後でどの様なことが起こっているのか理解する必要がありますが、そのようなことを吸収してTerraformが処理してくれます。 |
※宣言型とは具体的な構築手順を意識しなくてもその通りにデプロイが可能な事を指します。
ここまででTerraformについてはなんとなく理解ができたかと思いますので、今回、AWS上に構築する構成図を下記に示します。
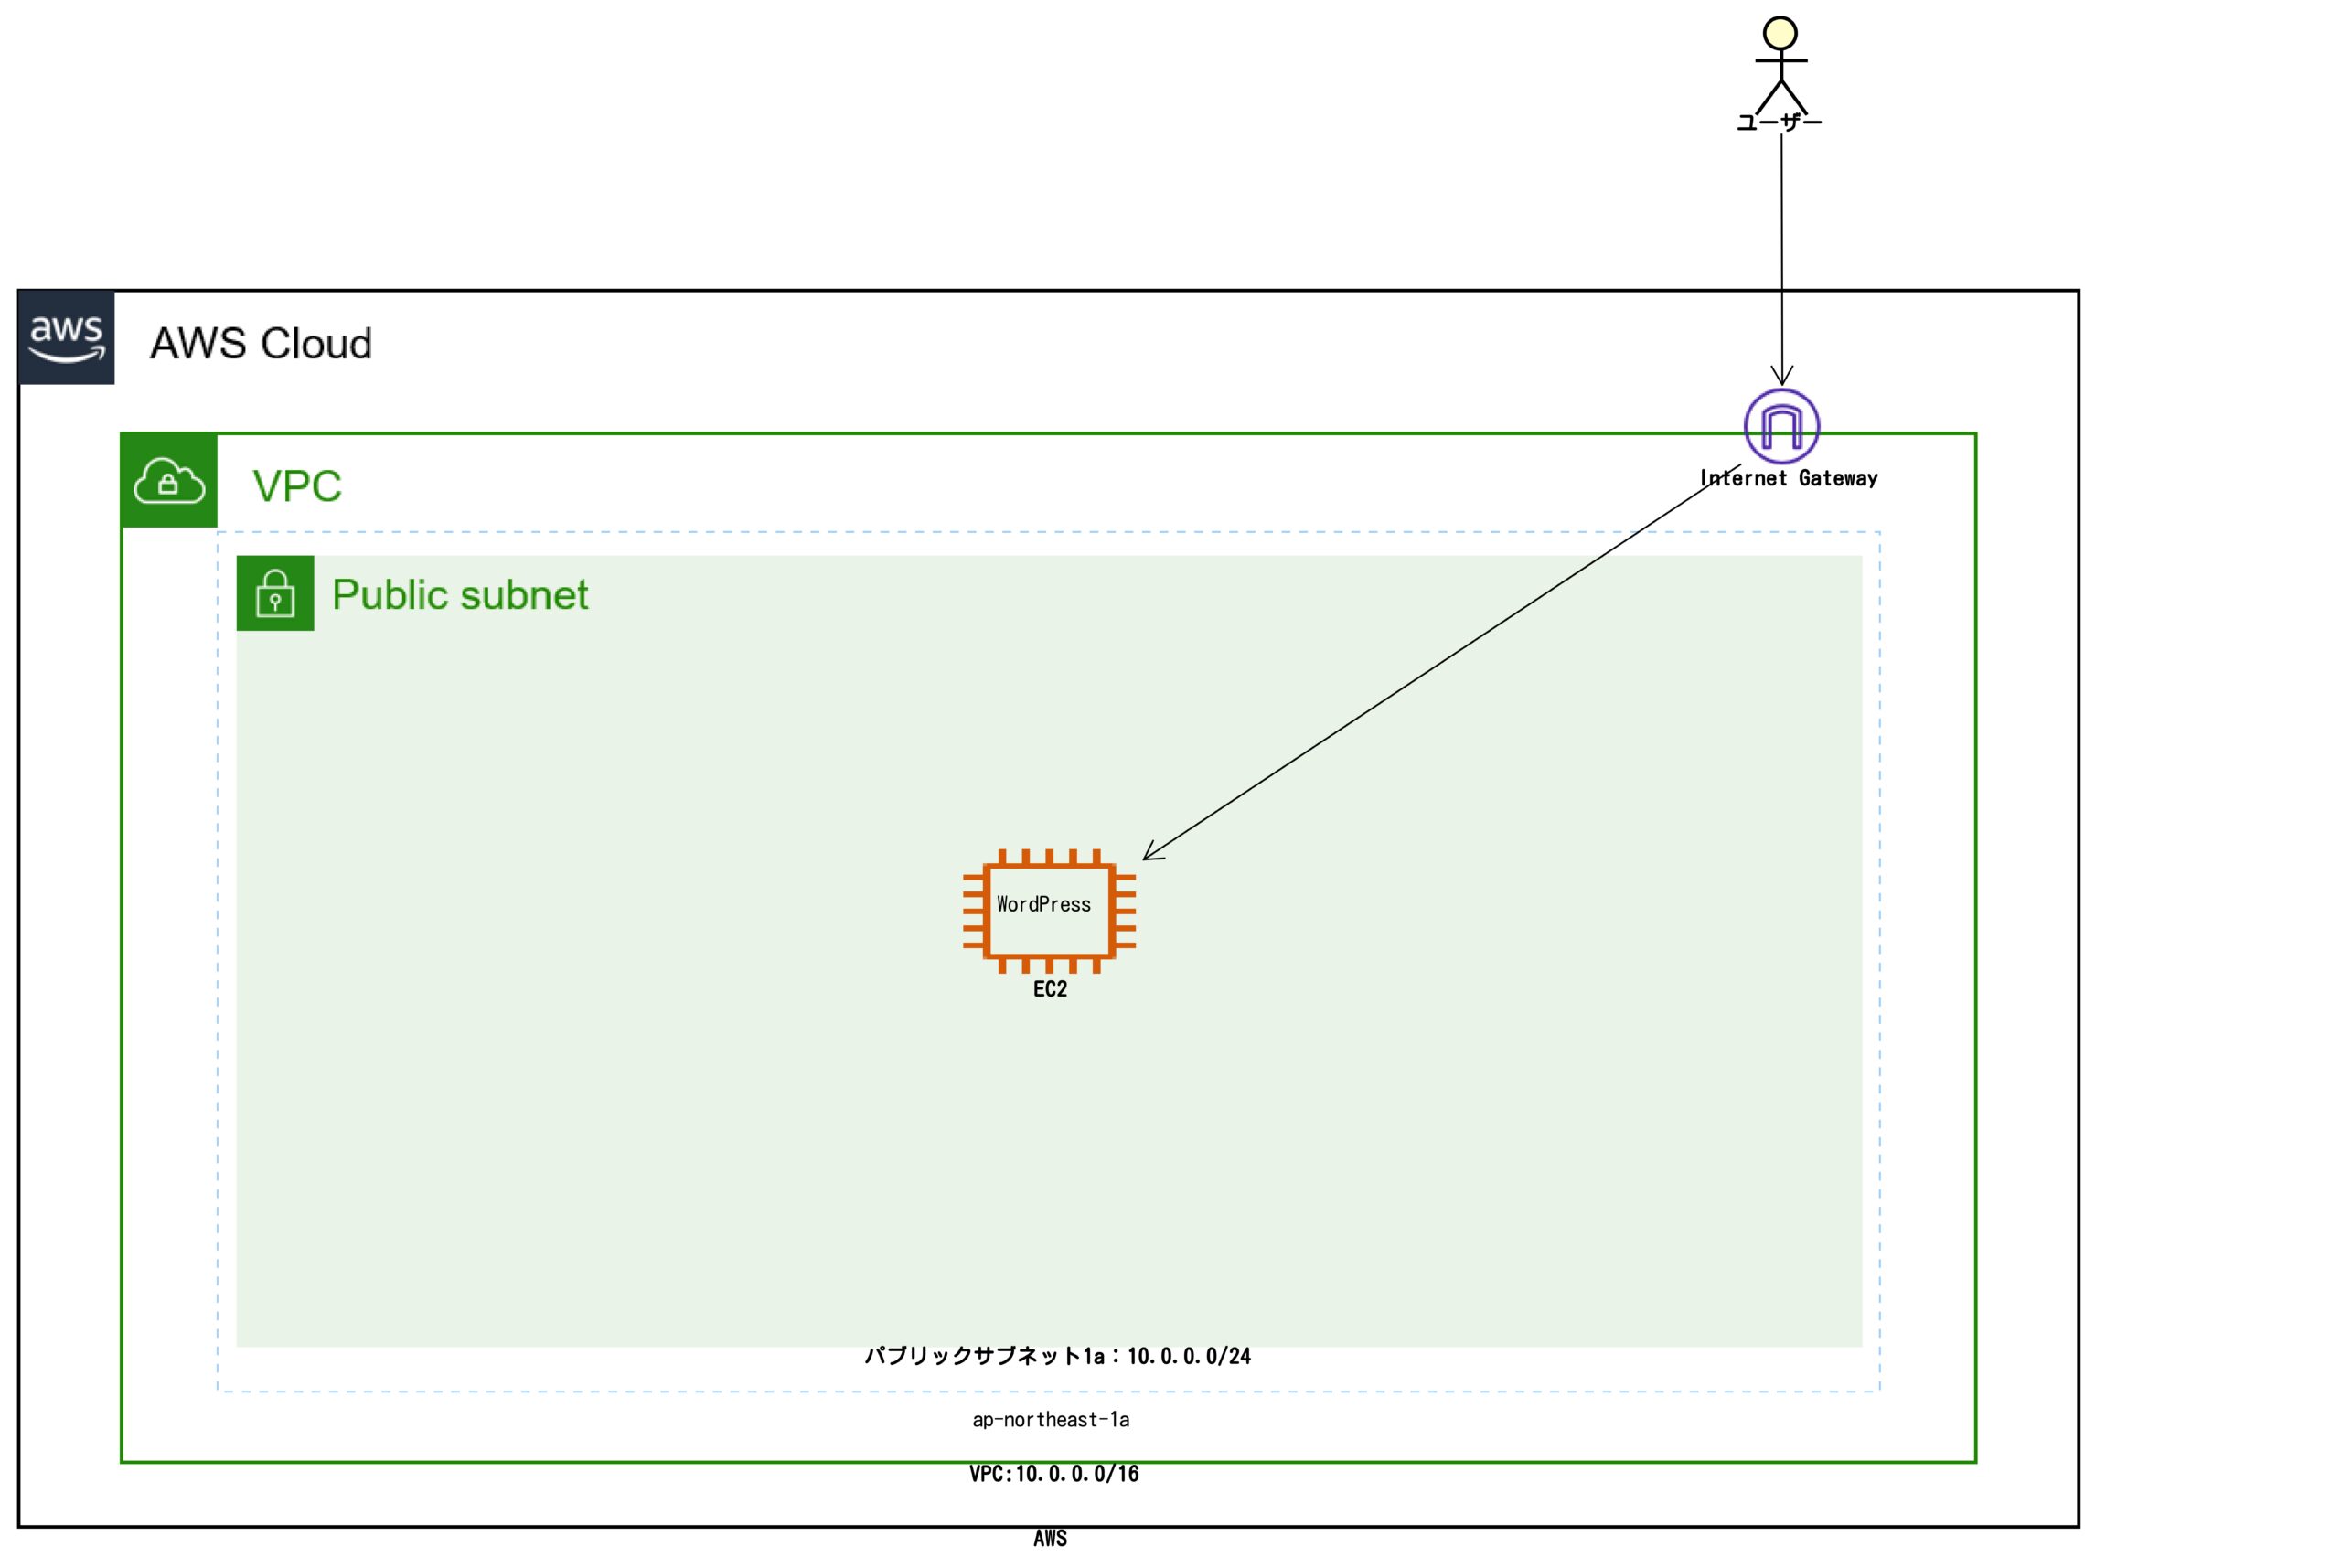
至って単純な構成であることがおわかりになるかと思います。
AWSでいうところのベストプラクティスには則っていませんがテスト環境なので良しとします。
それでは、実際にやっていきます。
手順
Terraformのインストール
今回、インストールする環境は、CentOS8を想定していますので、下記、Terraformのページ通りにインストールをおこなっていきます。
Terraformのインストール
※CentOS7やUbuntu等のバイナリパッケージやレポジトリを介してのインストールなどTerraformのページに記載がございますので各々の環境に合わせてインストールしてください。
「dnf config-manager」を使用するため、「dnf-plugins-core」をインストールします。
[dev_user@dev ~]$ sudo dnf install -y dnf-plugins-core
[sudo] dev_user のパスワード:
メタデータの期限切れの最終確認: 0:04:17 時間前の 2020年12月28日 06時26分52秒 に実施しました。
Package dnf-plugins-core-4.0.2.2-3.el8.noarch is already installed.
依存関係が解決しました。
・
・
・
完了しました!
Terraformの格納されているレポジトリをインストールします。
レポジトリ部分で「https://rpm.releases.hashicorp.com/$release/hashicorp.repo」、「$release」の箇所を下記対応表の通りに置き換えてインストールします。 | ディストリビューション | $release |
|---|---|
| Red Hat Enterprise Linux | RHEL |
| Fedora | fedora |
| Amazon Linux | AmazonLinux |
[dev_user@dev ~]$ sudo dnf config-manager --add-repo https://rpm.releases.hashicorp.com/RHEL/hashicorp.repo
----------------------------------------------------------------
repo の追加: https://rpm.releases.hashicorp.com/RHEL/hashicorp.repo
----------------------------------------------------------------
Terraformはバージョンによって書き方に際が発生することなどありますので、本手順では 「terraform.x86_64 0.14.3-1」 を使用することとします。
※他バージョンでも置き換えていけば動作可能ですので、すでにTerraformを使用している方は拘らなくても良いです。
[dev_user@dev ~]$ dnf --showduplicate list terraform --enablerepo=hashicorp
Hashicorp Stable - x86_64   1.6 kB/s | 1.4 kB     00:00
利用可能なパッケージ
terraform.x86_64 0.11.14-1  hashicorp
terraform.x86_64 0.12.26-1  hashicorp
terraform.x86_64 0.12.27-1  hashicorp
terraform.x86_64 0.12.28-1  hashicorp
terraform.x86_64 0.12.29-1  hashicorp
terraform.x86_64 0.13.0-1   hashicorp
terraform.x86_64 0.13.1-1   hashicorp
terraform.x86_64 0.13.2-1   hashicorp
terraform.x86_64 0.13.3-1   hashicorp
terraform.x86_64 0.13.4-1   hashicorp
terraform.x86_64 0.13.4-2   hashicorp
terraform.x86_64 0.13.5-1   hashicorp
terraform.x86_64 0.14.0-1   hashicorp
terraform.x86_64 0.14.1-1   hashicorp
terraform.x86_64 0.14.2-1   hashicorp
terraform.x86_64 0.14.3-1   hashicorp
※一部見やすく加工しています。
[dev_user@dev ~]$ sudo dnf install terraform-0.14.3-1.x86_64 --enablerepo=hashicorp
[sudo] dev_user のパスワード:
Hashicorp Stable - x86_64  321 kB/s | 407 kB     00:01
依存関係が解決しました。
==================================================================
 パッケージ    アーキテクチャー  バージョン  リポジトリー  サイズ
==================================================================
インストール:
 terraform     x86_64            0.14.3-1    hashicorp     26 M

トランザクションの概要
==================================================================
インストール  1 パッケージ
・
・[中略]
・
これでよろしいですか? [y/N]: y
パッケージのダウンロード:
terraform-0.14.3-1.x86_64.rpm 7.9 MB/s |  26 MB     00:03
・
・[中略]
・
これでよろしいですか? [y/N]: y
・
・[中略]
・
  インストール     : terraform-0.14.3-1.x86_64
  検証             : terraform-0.14.3-1.x86_64

インストール済み:
  terraform-0.14.3-1.x86_64

完了しました!
※一部見やすく加工しています。
下記、コマンドで対象バージョンがインストールされたことを確認します。
[dev_user@dev ~]$ rpm -q terraform
terraform-0.14.3-1.x86_64[dev_user@dev ~]$ terraform --version
Terraform v0.14.3Terraformプロジェクトの作成
今回は、AWS上にインフラ環境を構築しますので、 「AWS Provider」 を使います。
詳細な内容については下記リンク先に記載がございます。
AWS Provider
[dev_user@dev ~]$ mkdir terraform-aws-ec2-wordpress
[dev_user@dev ~]$ cd terraform-aws-ec2-wordpress/
上記、ディレクトリを作成し、作成したディレクトリへ移動します。
Terraformは、 HCL(Hashicorp Config Language) という独自の言語を使用して人間にもわかりやすく機械処理しやすい形でインフラの状態を表現することが可能な言語を使っていき、 .tf という拡張子で表されます。
main.tfというファイルを作成し、プロバイダー情報や、AWSのIAMユーザに関すること記述します。
これは、Terraform 0.13以降の書き方となります。
[dev_user@dev terraform-aws-ec2-wordpress]$ vi main.tf
terraform {
    required_providers {
      aws = {
          source = "hashicorp/aws"
          version = "~> 3.0"
      }
    }
}

variable "aws_access_key" {}
variable "aws_secret_key" {}
variable region {
  default     = "ap-northeast-1"
}

provider "aws" {
    access_key = var.aws_access_key
    secret_key = var.aws_secret_key
    region = var.region
}
terraform.tfvarsというファイルは特別なファイルとなり、自動的に読み込まれ、外に公開したくない認証情報などを記載しておくものになります。
構文は、 「変数名 = 値」 という形式になります。
※gitに公開する場合、terraform.tfvarsを管理対象外ファイルに指定し、外だしするようにします。
別記事にはなりますが、Amplifyの記事で、IAMユーザ作成をする下記リンク記事が参考になりますのでこれをもとにIAMユーザを作成します。
IAMユーザには管理者権限が必要になりますので管理者アカウントでログインする必要があります。
「Amplifyを設定する」
※AWS参考記事
「設定ファイルと認証情報ファイルの設定」
「設定の基本」
[dev_user@dev terraform-aws-ec2-wordpress]$ vi terraform.tfvars
aws_access_key = "{アクセスキー}"
aws_secret_key = "{シークレットキー}"
※一般的に「credentials.csv」に認証情報が記述されています。(IAMユーザ作成の時にダウンロードしておくようにします。)
それぞれ「{アクセスキー}」、「{シークレットキー}」を各々のものにあわせてください。
ここまでで、下記、2ファイルが存在することを確認します。
[dev_user@dev terraform-aws-ec2-wordpress]$ ls -1
main.tf
terraform.tfvars
terraformのプロジェクト初期化およびプラグインダウンロードの為、 「terraform init」 コマンドを使用します。
「hashicorp/aws v3.22.0」のダウンロードがなされ、「Terraform has been successfully initialized!」でプロジェクトの初期化が完了したことになります。
※terraformバックエンドやモジュールの変更を実施した場合、再初期化が必要となります。
[dev_user@dev terraform-aws-ec2-wordpress]$ terraform init
Initializing the backend...

Initializing provider plugins...
- Finding hashicorp/aws versions matching "~> 3.0"...
- Installing hashicorp/aws v3.22.0...
- Installed hashicorp/aws v3.22.0 (signed by HashiCorp)

Terraform has created a lock file .terraform.lock.hcl to record the provider
selections it made above. Include this file in your version control repository
so that Terraform can guarantee to make the same selections by default when
you run "terraform init" in the future.

Terraform has been successfully initialized!

You may now begin working with Terraform. Try running "terraform plan" to see
any changes that are required for your infrastructure. All Terraform commands
should now work.

If you ever set or change modules or backend configuration for Terraform,
rerun this command to reinitialize your working directory. If you forget, other
commands will detect it and remind you to do so if necessary.
初期化完了後、下記状態となっていることを確認します。
[dev_user@dev terraform-aws-ec2-wordpress]$ ls -1a
.
..
.terraform
.terraform.lock.hcl
main.tf
terraform.tfvars
terraform-provider-awsのバイナリファイルができていることが確認できます。
[dev_user@dev terraform-aws-ec2-wordpress]$ ls -laR .terraform/
.terraform/providers/registry.terraform.io/hashicorp/aws/3.22.0/linux_amd64:
合計 166112
drwxr-xr-x. 2 dev_user dev_user        47 12月 28 08:19 .
drwxr-xr-x. 3 dev_user dev_user        25 12月 28 08:19 ..
-rwxr-xr-x. 1 dev_user dev_user 170098688 12月 28 08:19 terraform-provider-aws_v3.22.0_x5
ここまでで、Terraform環境の構築およびプロジェクトフォルダー作成が完了となります。
VS CODEとの連携
この章はVS CODEを使用している方で、terraformファイルをVS CODEを通して編集している方向けになります。
その他、環境を使用している方は飛ばしてください。
ここでの解説は、リモート環境に対して、VS CODEから接続していることを前提し話しを進めます。
VS CODEの拡張機能タブより下記に示す拡張機能をインストールしてください。
これらは、terraformを記述する上で構文チェックおよび、コード補完をおこなってくれるものとなります。
拡張機能をインストールした後は必ず、拡張機能タブにある「最新の情報に更新」ボタンを押すようにします。
分からない場合には、再度VS CODEでリモートSSHしてください。
| ツール名 | リンク | 識別子 |
|---|---|---|
| Terraform | https://marketplace.visualstudio.com/items?itemName=4ops.terraform | 4ops.terraform |
| HashiCorp Terraform | https://marketplace.visualstudio.com/items?itemName=HashiCorp.terraform | HashiCorp.terraform |
vs codeのsetting.jsonに対して、下記内容を追記します。
※[ファイル]→[ユーザ設定]→[設定]を開くとリモートSSHをしている場合、「ユーザ、リモート[SSH:{IP}]、ワークスペースという3つの項目がありますが、リモート[SSH:{IP}]を選択し、[設定の検索]欄に「config」と入力します。
その後、下にスクロールしていくと、[setting.jsonで編集]という項目が出現しますのでクリックすると編集画面へ遷移します。
{
    /* https://marketplace.visualstudio.com/items?itemName=HashiCorp.terraform#known-issues */
    /* begin */
    "terraform.languageServer": {
        "external" : true,
        "args": [
            "serve"
        ]
    }
    /* end */
}
これで、VS CODEとの連携設定は終了です。
VPCの作成
以下では、VS CODEを使用していない方との互換性を保つためにviコマンドで記述します。
[dev_user@dev terraform-aws-ec2-wordpress]$ vi vpc.tf
####################
# VPC
# https://registry.terraform.io/providers/hashicorp/aws/latest/docs/resources/vpc
####################
resource "aws_vpc" "myVpc" {
    cidr_block = "10.0.0.0/16"
    enable_dns_support = "true"
    enable_dns_hostnames = "true"

    tags = {
        "Name" = "vpc_ec2_wordpress"
    }
}

####################
# Subnet
# https://registry.terraform.io/providers/hashicorp/aws/latest/docs/resources/subnet
####################
resource "aws_subnet" "mySubnetPub1a" {
  vpc_id = aws_vpc.myVpc.id
  availability_zone = "${var.region}a"
  cidr_block = "10.0.0.0/24"
  map_public_ip_on_launch = "true"

  tags = {
      Name = "パブリックサブネット-1a"
  }
}

####################
# Route Table
# https://registry.terraform.io/providers/hashicorp/aws/latest/docs/resources/route_table
####################
resource "aws_route_table" "myPubRoute1a" {
    vpc_id = aws_vpc.myVpc.id

    tags = {
      Name = "パブリックルートテーブル"
    }
}

####################
# IGW
# https://registry.terraform.io/providers/hashicorp/aws/latest/docs/data-sources/internet_gateway
####################
resource "aws_internet_gateway" "myIgw" {
  vpc_id = aws_vpc.myVpc.id

  tags = {
    Name = "インターネットゲートウェイ"
  }
}

####################
# Route Rule
# https://registry.terraform.io/providers/hashicorp/aws/latest/docs/resources/route
####################
resource "aws_route" "myPubRouteRule1a" {
  route_table_id = aws_route_table.myPubRoute1a.id
  destination_cidr_block = "0.0.0.0/0"
  gateway_id = aws_internet_gateway.myIgw.id
  depends_on = [aws_route_table.myPubRoute1a]
}

####################
# Route Rule Associcate Subnet
# https://registry.terraform.io/providers/hashicorp/aws/latest/docs/resources/route_table_association
####################
resource "aws_route_table_association" "myPubRouteRuleAssociatSubnet1a" {
    subnet_id = aws_subnet.mySubnetPub1a.id
    route_table_id = aws_route_table.myPubRoute1a.id
}
Security Groupの作成
[dev_user@dev terraform-aws-ec2-wordpress]$ vi sg.tf
####################
# Security Group
# https://registry.terraform.io/providers/hashicorp/aws/latest/docs/resources/security_group
####################
resource "aws_security_group" "sgEc2" {
    name = "fw-ec2"
    description = "SG_EC2"
    vpc_id = aws_vpc.myVpc.id
}

####################
# Security Group Rule
# https://registry.terraform.io/providers/hashicorp/aws/latest/docs/resources/security_group_rule
####################
resource "aws_security_group_rule" "sgEc2Accept80" {
    security_group_id = aws_security_group.sgEc2.id
    type = "ingress"
    protocol = "tcp"
    from_port = 80
    to_port = 80
    cidr_blocks = ["0.0.0.0/0"]
    description = "SG_EC2_ACCEPT_80"
}

resource "aws_security_group_rule" "sgEc2Accept0" {
    security_group_id = aws_security_group.sgEc2.id
    type = "egress"
    protocol = "-1"
    from_port = 0
    to_port = 0
    cidr_blocks = ["0.0.0.0/0"]
    description = "SG_EC2_ACCEPT_ANY_OUTBOUND"
}
EC2インスタンスの作成
[dev_user@dev terraform-aws-ec2-wordpress]$ vi ec2.tf
####################
# AMI
# https://registry.terraform.io/providers/hashicorp/aws/latest/docs/data-sources/ami
####################
data "aws_ami" "myAmi" {
    most_recent = "true" # 最新のAMIを常に使用する。
    owners = [
        "amazon"
    ]
    filter {
        name = "name" # The name of the AMI that was provided during image creation
        values = [
            # aws ec2 describe-images --owners amazon | grep -C 20 ami-01748a72bed07727c
            "amzn2-ami-hvm-*-x86_64-gp2"
        ]
    }
}

####################
# EC2 Instance
# https://registry.terraform.io/providers/hashicorp/aws/latest/docs/resources/instance
####################
resource "aws_instance" "myAmazonLinux2" {
    ami = data.aws_ami.myAmi.id
    instance_type = "t2.nano"
    subnet_id = aws_subnet.mySubnetPub1a.id
    vpc_security_group_ids = [
        aws_security_group.sgEc2.id
    ]
    user_data = file("userdata.sh")

    tags = {
      "Name" = "Amazon Linux2 インスタンス"
    }
}
WordPressインストールスクリプト設置
[dev_user@dev terraform-aws-ec2-wordpress]$ vi userdata.sh
#!/bin/bash

yum -y update
amazon-linux-extras install php7.2 -y
yum -y install mysql httpd php-mbstring php-xml

wget http://ja.wordpress.org/latest-ja.tar.gz -P /tmp/
tar zxvf /tmp/latest-ja.tar.gz -C /tmp
cp -r /tmp/wordpress/* /var/www/html/
chown apache:apache -R /var/www/html

systemctl enable httpd.service
systemctl start httpd.service
デプロイ
ここまでで、下記ファイルができていることを確認します。
[dev_user@dev terraform-aws-ec2-wordpress]$ ls -1a
.
..
.terraform
.terraform.lock.hcl
ec2.tf
main.tf
sg.tf
terraform.tfvars
userdata.sh
vpc.tf
「terraform plan」 コマンドで実際に実行される内容の確認をおこないます。
上記コマンドを実施しただけでは、AWS上へ反映されません。
下記のようなメーセッジが出力されることを確認します。
To perform exactly these actions, run the following command to apply:
    terraform apply "output.bin"
[dev_user@dev terraform-aws-ec2-wordpress]$ terraform plan -out=output.bin
An execution plan has been generated and is shown below.
Resource actions are indicated with the following symbols:
  + create

Terraform will perform the following actions:
・
・[中略]
・
Plan: 10 to add, 0 to change, 0 to destroy.

------------------------------------------------------------------------

This plan was saved to: output.bin

To perform exactly these actions, run the following command to apply:
    terraform apply "output.bin"
定義内容に問題なければ、実際にAWS上へデプロイします。
デプロイは 「terraform apply "output.bin"」 コマンドを実施することで可能です。
万が一、デプロイ中にエラーが起きた場合、実行途中でエラーがおきたことを知らせてくれます。
「Apply complete!」 と出力されればデプロイ成功です。
[dev_user@dev terraform-aws-ec2-wordpress]$ terraform apply "output.bin"
aws_vpc.myVpc: Creating...
aws_vpc.myVpc: Creation complete after 2s [id=vpc-0d503d0d4e011d6b7]
aws_internet_gateway.myIgw: Creating...
aws_route_table.myPubRoute1a: Creating...
aws_subnet.mySubnetPub1a: Creating...
aws_security_group.sgEc2: Creating...
aws_route_table.myPubRoute1a: Creation complete after 1s [id=rtb-00e3ce09b1040ec02]
aws_internet_gateway.myIgw: Creation complete after 1s [id=igw-0d173853b7fd06327]
aws_security_group.sgEc2: Creation complete after 2s [id=sg-04e59f251b876178b]
aws_subnet.mySubnetPub1a: Creation complete after 2s [id=subnet-09d5290e144b6b7a2]
aws_route.myPubRouteRule1a: Creating...
aws_route_table_association.myPubRouteRuleAssociatSubnet1a: Creating...
aws_security_group_rule.sgEc2Accept80: Creating...
aws_security_group_rule.sgEc2Accept0: Creating...
aws_instance.myAmazonLinux2: Creating...
aws_route_table_association.myPubRouteRuleAssociatSubnet1a: Creation complete after 0s [id=rtbassoc-001103ac461ca8c9d]
aws_route.myPubRouteRule1a: Creation complete after 0s [id=r-rtb-00e3ce09b1040ec021080289494]
aws_security_group_rule.sgEc2Accept80: Creation complete after 1s [id=sgrule-2334999895]
aws_security_group_rule.sgEc2Accept0: Creation complete after 1s [id=sgrule-1633797118]
aws_instance.myAmazonLinux2: Still creating... [10s elapsed]
aws_instance.myAmazonLinux2: Still creating... [20s elapsed]
aws_instance.myAmazonLinux2: Creation complete after 22s [id=i-056100f17246ac750]

Apply complete! Resources: 10 added, 0 changed, 0 destroyed.

The state of your infrastructure has been saved to the path
below. This state is required to modify and destroy your
infrastructure, so keep it safe. To inspect the complete state
use the `terraform show` command.

State path: terraform.tfstate
「terraform show」 コマンドでterraformが作成したオブジェクト一覧を確認することが可能です。
出力内容が長いのでここでは割愛しています。
また、デプロイに成功した段階で、 「terraform.tfstate」 ファイルが生成されます。
これは、現在のTerraformが管理しているリソースの状態を表しているもので、次回、applyするときや、リソースの削除を実施する際に必要となる物なのです。
誤って削除すると、大変なので、ローカルやプライベートレポジトリに保存等が必要になります。
動作確認
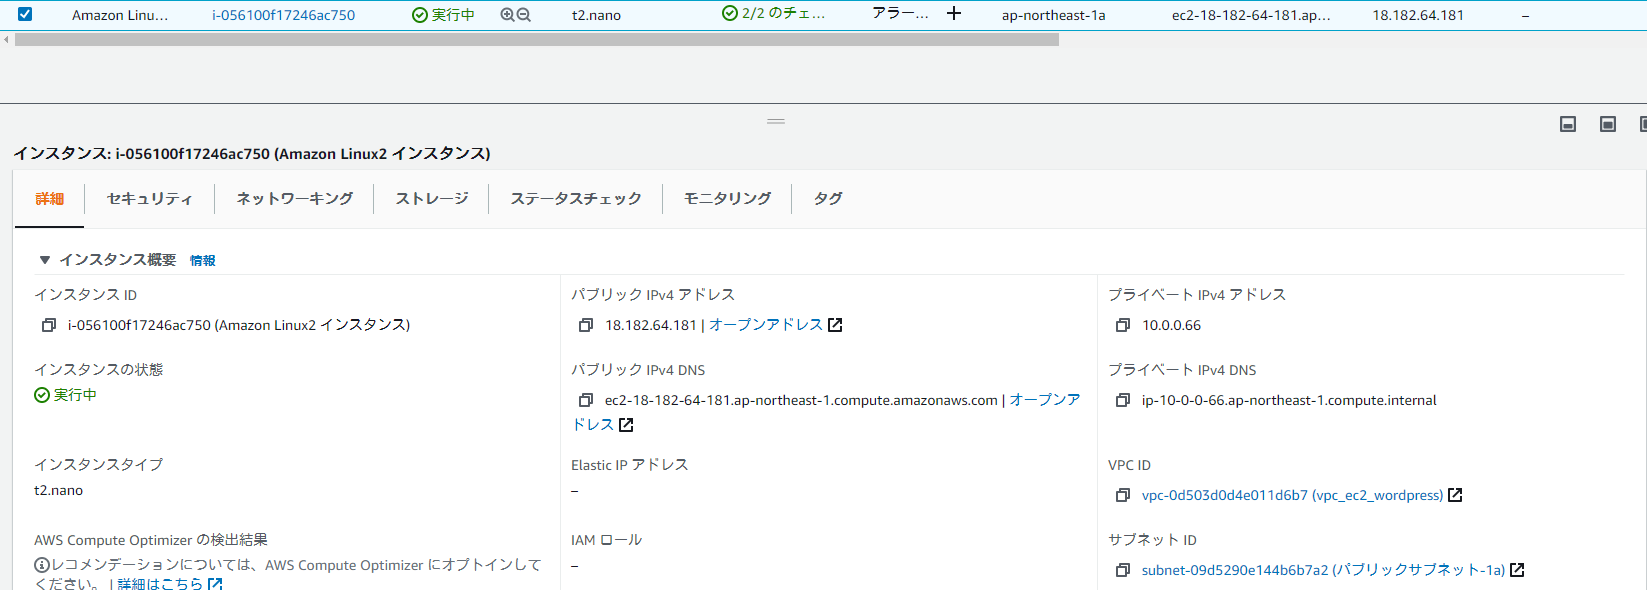
AWSの「AWS マネジメントコンソール」へログインし、実際に作成したEC2インスタンスを確認します。
タグ名を 「Amazon Linux2 インスタンス」 としているのですぐに見分けがつくと思います。
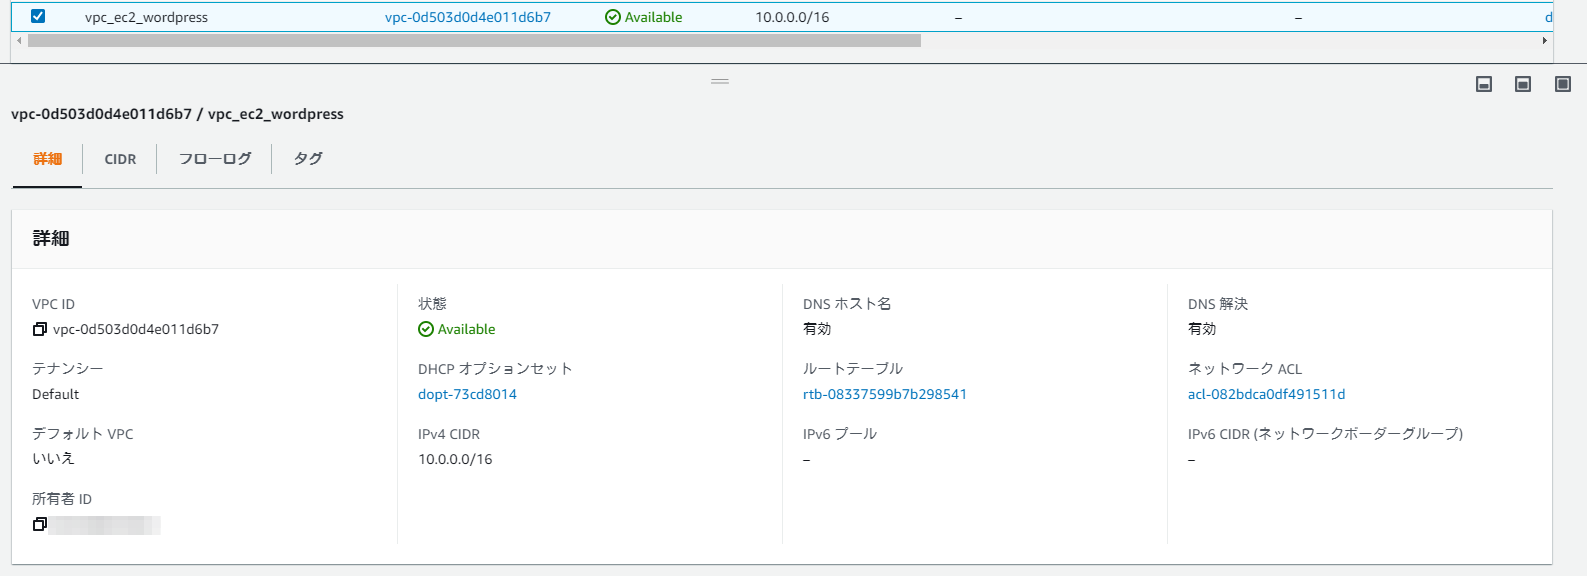
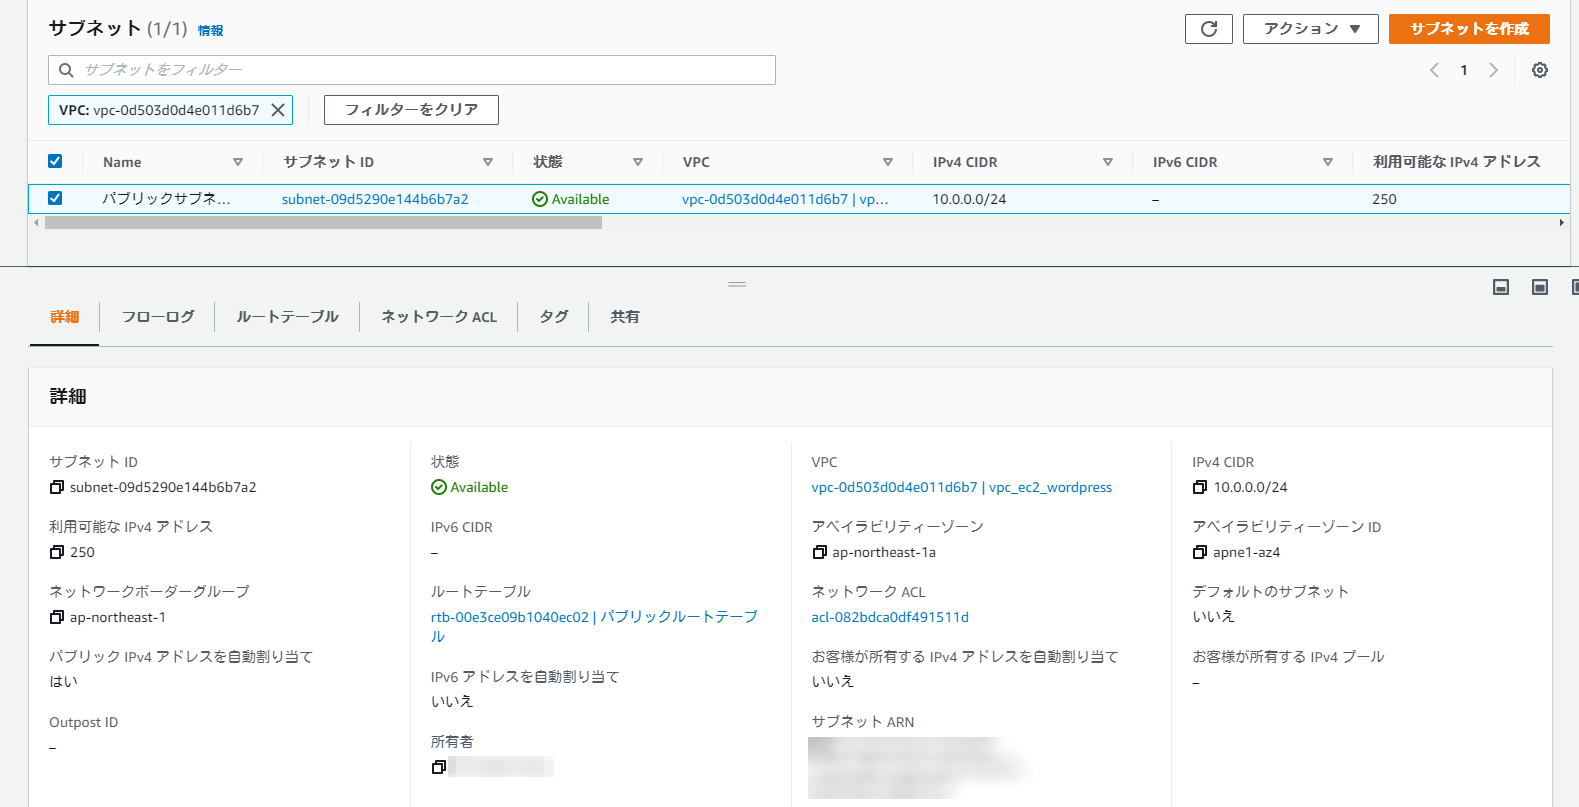
定義したVPCやサブネットも正常に作成されていることが確認できます。
下記、画像はセキュリティグループです。
インバウンドがhttpのみ許可されアウトバウンドがanyになっていることが確認できます。


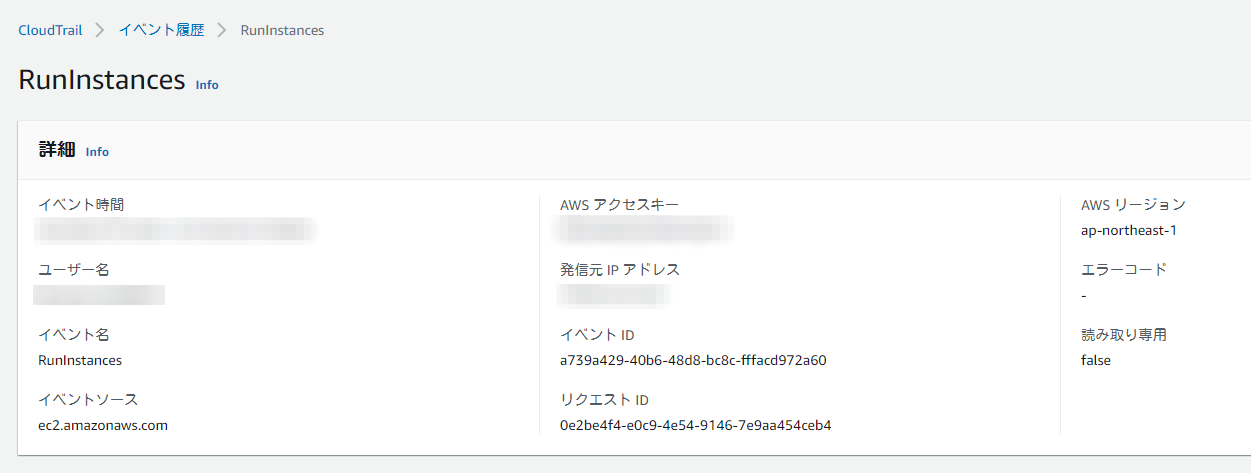
下記、画像が、Cloud Trailの証跡情報です。
今回設定した、認証情報から操作されていることが確認できます。
インスタンスの「パブリック IPv4 アドレス」にhttpでアクセスして、WordPressのインストール画面がでることを確認します。
下記画像のようになれば大丈夫です。

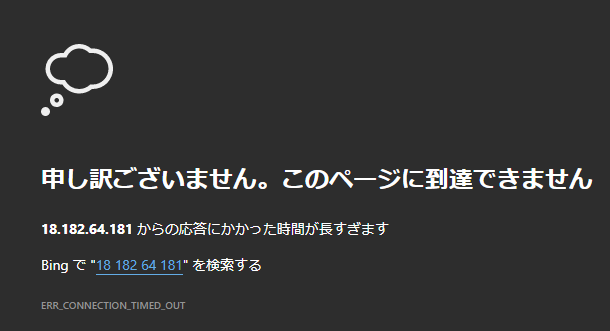
リソースの削除
「terraform destroy」 を実行すると本当に削除しても良いか聞かれるので「yes」と入力し削除を実行します。
処理が完了すること 「Destroy complete!」 と出力されます。
[dev_user@dev terraform-aws-ec2-wordpress]$ terraform destroy
An execution plan has been generated and is shown below.
Resource actions are indicated with the following symbols:
  - destroy
・
・[中略]
・
Destroy complete! Resources: 10 destroyed.
先ほど、アクセスしたWordPressのインストールページにアクセスすると、下記の画像のようにアクセスできなくなっていることが確認できます。
まとめ
どうでしょうか、すくない記述でAWS上に環境を構築することができました。
Terraformについて筆者自身わからないことがいっぱいありますが、インフラ管理のツールとしてこれからも勉強していこうと思っています。
この記事が、誰かの一助となれば幸いです。

プロフィール
AWSの設計・構築をメインにおこなっています。
運用・保守をおこなう部署におりましたが、最近、アーキテクト課に異動しました。
日々精進しております。