
目次
ごあいさつ
こんばんは。
テレワーク中は地べたに座っているため、脚へのダメージが半端ないもに倉です。
今回は、EC2を使ったクライアント認証付WEBサイトにて
ELBを使うためのあれこれを書いていきます。
結構複雑なお話なので、気張っていきましょう!
その①って……
その①では下ごしらえとして、EC2で作ったテスト用のサイトに
クライアント認証設定をするところまでをご紹介します。
そこまではできた! ELBの設定が知りたい! という方は、その②に進んでください。
EC2を使ってWEBサイトを用意
それではまず、クライアント認証つきのWEBサイトを用意します。
適当なサイトを作る
普段通りEC2を立ち上げたら、テスト用のサイトを作ります。
こんなかんじで本当突貫工事ですが、本題はここではないのでよいでしょう。
SSL対応のサイトにする
……そういえば、クライアント認証はSSL設定のオプション的な立ち位置なので、
サイトをSSLに対応させないといけないのでした。

即対応――
今回は自己証明書で対応させましたが、お好きなやり方でどうぞ。
クライアント証明書を発行する
プライベート認証局を建てる
ACMを使用してプライベート認証局を建てて発行する方法もありますが、それでは月額料金がかかるため
今回は先ほど作成したEC2インスタンスの中に建てていきます。
OpenSSL の設定をプライベート認証局構築用に変更
vi /etc/pki/tls/openssl.cnf
○172行目
basicConstraints=CA:FALSE
↓変更
basicConstraints=CA:TRUE

○250行目
# nsCertType = sslCA, emailCA
↓変更
nsCertType = sslCA, emailCA
証明書のラベル付けに使用するシリアルファイルを作成
vi /etc/pki/CA/serial
00プライベート認証局を作成
/etc/pki/tls/misc/CA -newca
CA certificate filename (or enter to create)
<エンター>
Making CA certificate ...
Generating a 2048 bit RSA private key
.............................................................................+++
......................................+++
writing new private key to '/etc/pki/CA/private/./cakey.pem'
Enter PEM pass phrase:<適当なパス>
Verifying - Enter PEM pass phrase:<適当なパス>
-----
You are about to be asked to enter information that will be incorporated
into your certificate request.
What you are about to enter is what is called a Distinguished Name or a DN.
There are quite a few fields but you can leave some blank
For some fields there will be a default value,
If you enter '.', the field will be left blank.
-----
Country Name (2 letter code) [XX]:JP←お好きな国
State or Province Name (full name) []:Osaka←お好きなところ
Locality Name (eg, city) [Default City]:
Organization Name (eg, company) [Default Company Ltd]:
Organizational Unit Name (eg, section) []:
Common Name (eg, your name or your server's hostname) []:moni-test-CA←お好きな局名
Email Address []:

Please enter the following 'extra' attributes
to be sent with your certificate request
A challenge password []:
An optional company name []:
Using configuration from /etc/pki/tls/openssl.cnf
Enter pass phrase for /etc/pki/CA/private/./cakey.pem:<適当なパス>
Check that the request matches the signature
Signature ok
(中略)
Data Base Updated
もしミスってやり直したくなったら以下のコマンドを叩いてください。
rm -f /etc/pki/CA/index.txt
rm -f /etc/pki/CA/private/cakey.pem
プライベート認証局の秘密鍵のパスフレーズを削除
openssl rsa -in /etc/pki/CA/private/cakey.pem -out /etc/pki/CA/private/cakey.pem
Enter pass phrase for /etc/pki/CA/private/cakey.pem:<適当なパス>
writing RSA key
プライベート認証局の秘密鍵のパーミションを変更
chmod 400 /etc/pki/CA/private/cakey.pem
これでプライベート認証局が建てられました!
/etc/pki/CA/cacert.pemが証明書です。
クライアント証明書の発行
OpenSSL の設定をクライアント証明書発行用に変更
vi /etc/pki/tls/openssl.cnf
○172行目
basicConstraints=CA:TRUE
↓変更
basicConstraints=CA:FALSE

○187行目
# nsCertType = client, email, objsign
↓変更
nsCertType = client, email, objsign

○250行目
nsCertType = sslCA, emailCA
↓
# nsCertType = sslCA, emailCA
作業用ディレクトリ作成
mkdir /etc/pki/tls/client
cd /etc/pki/tls/client/
秘密鍵作成
openssl genrsa -out client.key 2048
Generating RSA private key, 2048 bit long modulus
.............................................................+++
................................................+++
e is 65537 (0x10001)
CSR作成
openssl req -new -key client.key -out client.csr
You are about to be asked to enter information that will be incorporated
into your certificate request.
What you are about to enter is what is called a Distinguished Name or a DN.
There are quite a few fields but you can leave some blank
For some fields there will be a default value,
If you enter '.', the field will be left blank.
-----
Country Name (2 letter code) [XX]:JP←お好きな国
State or Province Name (full name) []:Osaka←お好きなところ
Locality Name (eg, city) [Default City]:
Organization Name (eg, company) [Default Company Ltd]:
Organizational Unit Name (eg, section) []:
Common Name (eg, your name or your server's hostname) []:client←お好きな名前
Email Address []:

Please enter the following 'extra' attributes
to be sent with your certificate request
A challenge password []:
An optional company name []:
証明書を発行
openssl ca -in client.csr -out client.crt
(略)
Certificate is to be certified until May 19 08:06:06 2023 GMT (365 days)
Sign the certificate? [y/n]:y

1 out of 1 certificate requests certified, commit? [y/n]y
Write out database with 1 new entries
Data Base Updated
秘密鍵と発行したクライアント証明書を PKCS#12ファイルにまとめる
openssl pkcs12 -export -in client.crt -inkey client.key -out client.p12
Enter Export Password:
Verifying - Enter Export Password:
ここで決めたパスワードはブラウザに証明書をインストールする際に
使用するので、忘れないように!
ここまでできたら/etc/pki/tls/client/client.p12をローカルに落としてきましょう。
confファイルに設定を記載する
confファイルに設定を記載し、クライアント認証を有効化します。
以下のように設定します。
<VirtualHost *:443>
    SSLEngine on
    SSLCertificateFile /etc/httpd/conf/server.crt
    SSLCertificateKeyFile /etc/httpd/conf/server.key

    SSLCACertificateFile /etc/pki/CA/cacert.pem  ←ココ
    SSLVerifyDepth 1  ←ココ

  ServerName moni.com
  DocumentRoot /var/www/moni.com

    <Directory "/var/www/moni.com">
        Options FollowSymLinks
        AllowOverride All
        # Require all granted

        SSLVerifyClient require  ←ココ
        Require expr %{SSL_CLIENT_S_DN_CN} == 'client'  ←ココ
    </Directory>
</VirtualHost>
これで設定完了です。
クライアント認証が効いているか確認
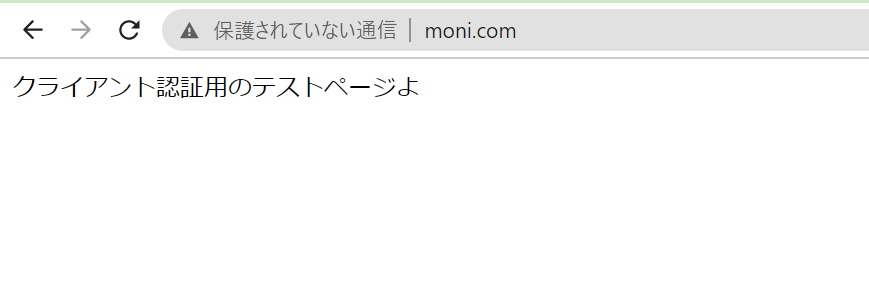
とりあえずすっぴんでサイトにアクセスしてみましょう。
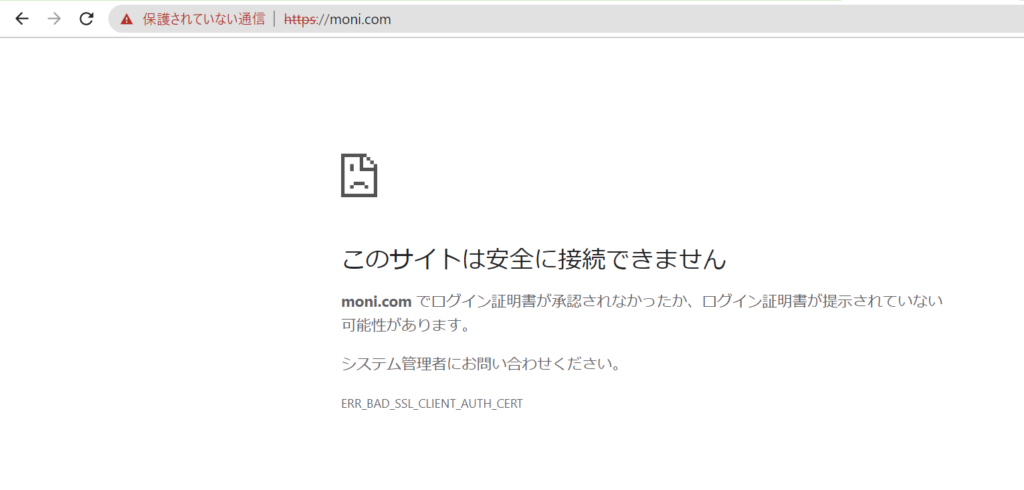
ああ……。
泣かれてしまいました。
無事、クライアント認証はかかっている気がしますね。
では、証明書を持っていればちゃんと表示されるかも確かめます。
落としてきた証明書をインポートして……
※ポチポチしていればインポートできます。
先ほどの泣きページを更新!
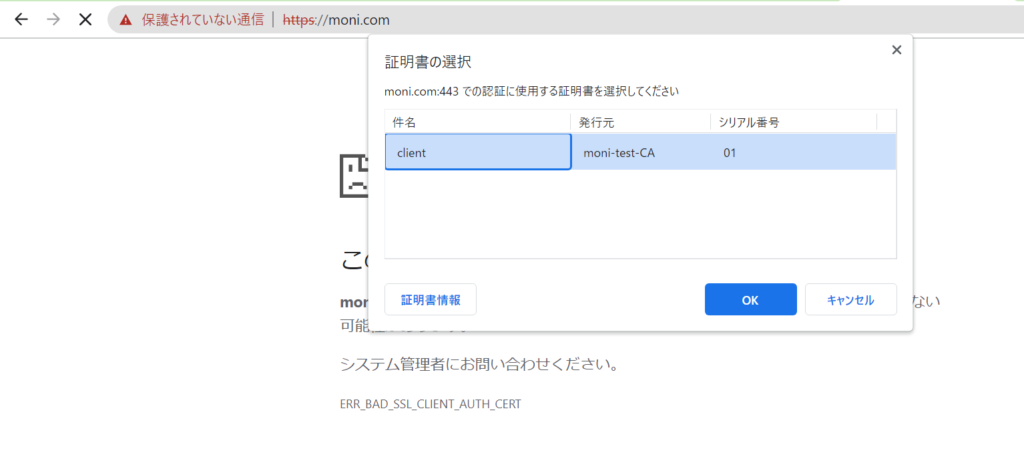
なにか起きました!!
使用する証明書を選べとのこと。OKを押せば……
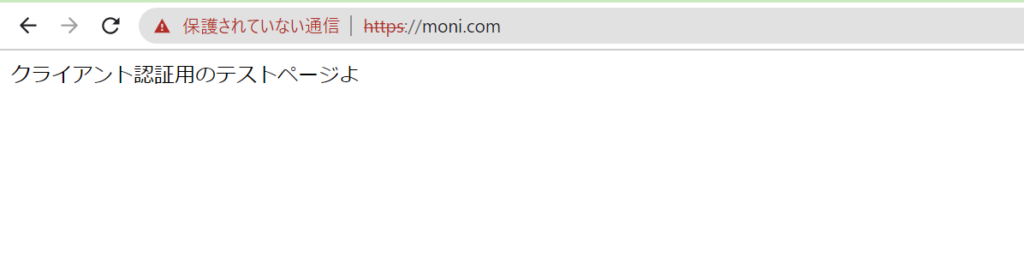
接続できました!
※さっき見た画像と一緒やんけと思われたかもしれませんが、
ちゃんと撮りなおしています。
これで、クライアント認証の設定はばっちりです。
次回へ続く……
これで下ごしらえは完了しました。
その②では、本題であるELBの設定方法をご紹介いたします。
参考URL
クライアント証明書認証の設定メモ(Apache2.4 + CentOS)

たまごのひび割れから身が見え始めたエンジニア。