目次
はじめに
ディーネットのよろず請負の深見です。前回のお話から年を越してしまいました。
遅くなりましたが本年もよろしくお願いいたします。
さて、前回のお話の続きになります。
VMware Tanzu Community Edition (TCE) のインストールと進めていきましょう。
[ 補足 ] 構築環境について
今回は、TCE の導入を中心に進めますので、導入のベースとなる vSphere 7.0 (ESXi) および vCenter Server Appliance 7 の環境は構築済みの想定とします。
- vSphere 7.0u3 (ESXi) のホスト x 1 (vSphere 6.7 最新で構築は可能)
- vCenter Server Appliance 7 Standard x 1
※vSphere 関連の試用版を利用するのであれば、60日間までの利用が可能です。
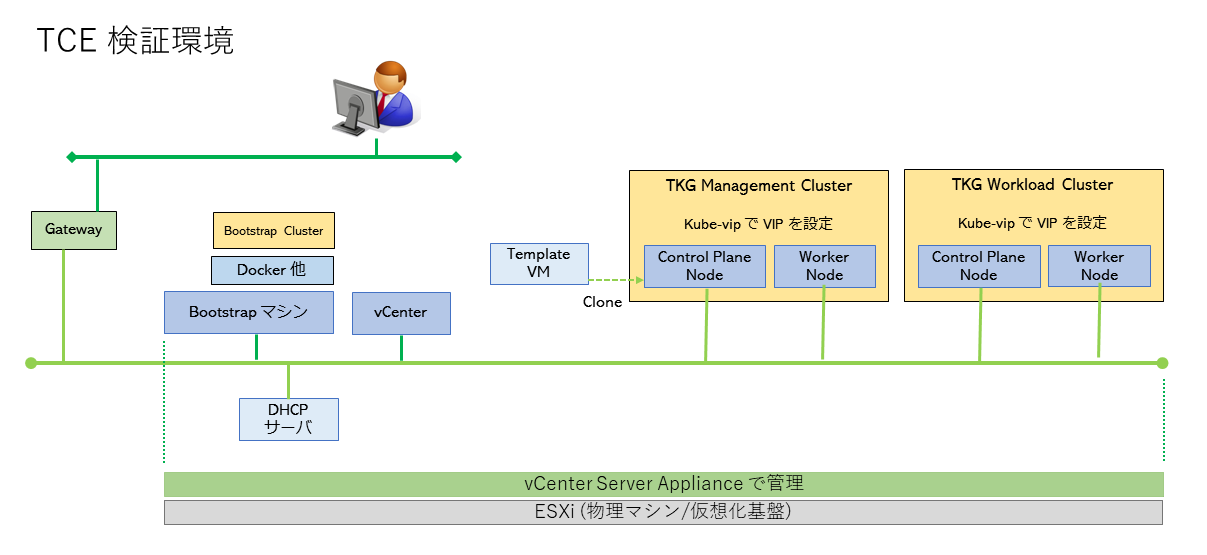
また、前回お知らせしました構成より都合により、若干構築する環境は以下となりますのでご了承を。

VMware Tanzu Community Edition (TCE) 環境の構築について
TCE 環境は以下の手順にて構築していきます。
-
DHCP サーバの構築
TCE (k8s) は、コンテナのオーケストレーションの際の IP アドレスは DHCP にて割り当てる様にします。
※今回、構築の環境では photon OS のイメージを使用して、事前に構築しています。 -
Bootstrap 環境の構築
「Management Cluster」、「Workload Cluster」の作成のために必要となります。
※DHCP サーバと同じく photon OS のイメージを使用してデプロイします。 -
Management Cluster の作成
-
Workload Cluster の作成
-
TCE 環境の調整
kubectl のプラグインを追加
LB (MetalLB) の追加
Bootstrap 環境の構築
ここでは、Linux サーバ (photon OS) をデプロイし、docker が稼働する環境を構築します。
OS 環境の準備
※「OVA with virtual hardware v13 (UEFI Secure Boot)」を利用してデプロイします。
ファイル名:photon-ova_uefi-4.0-c001795b80.ova
https://packages.vmware.com/photon/4.0/Rev2/ova/photon-ova_uefi-4.0-c001795b80.ova
※以降を考慮し、上記をあらかじめテンプレートとして登録しておきます。
→テンプレート名:photon-v4r2-ova_uefi-Template02
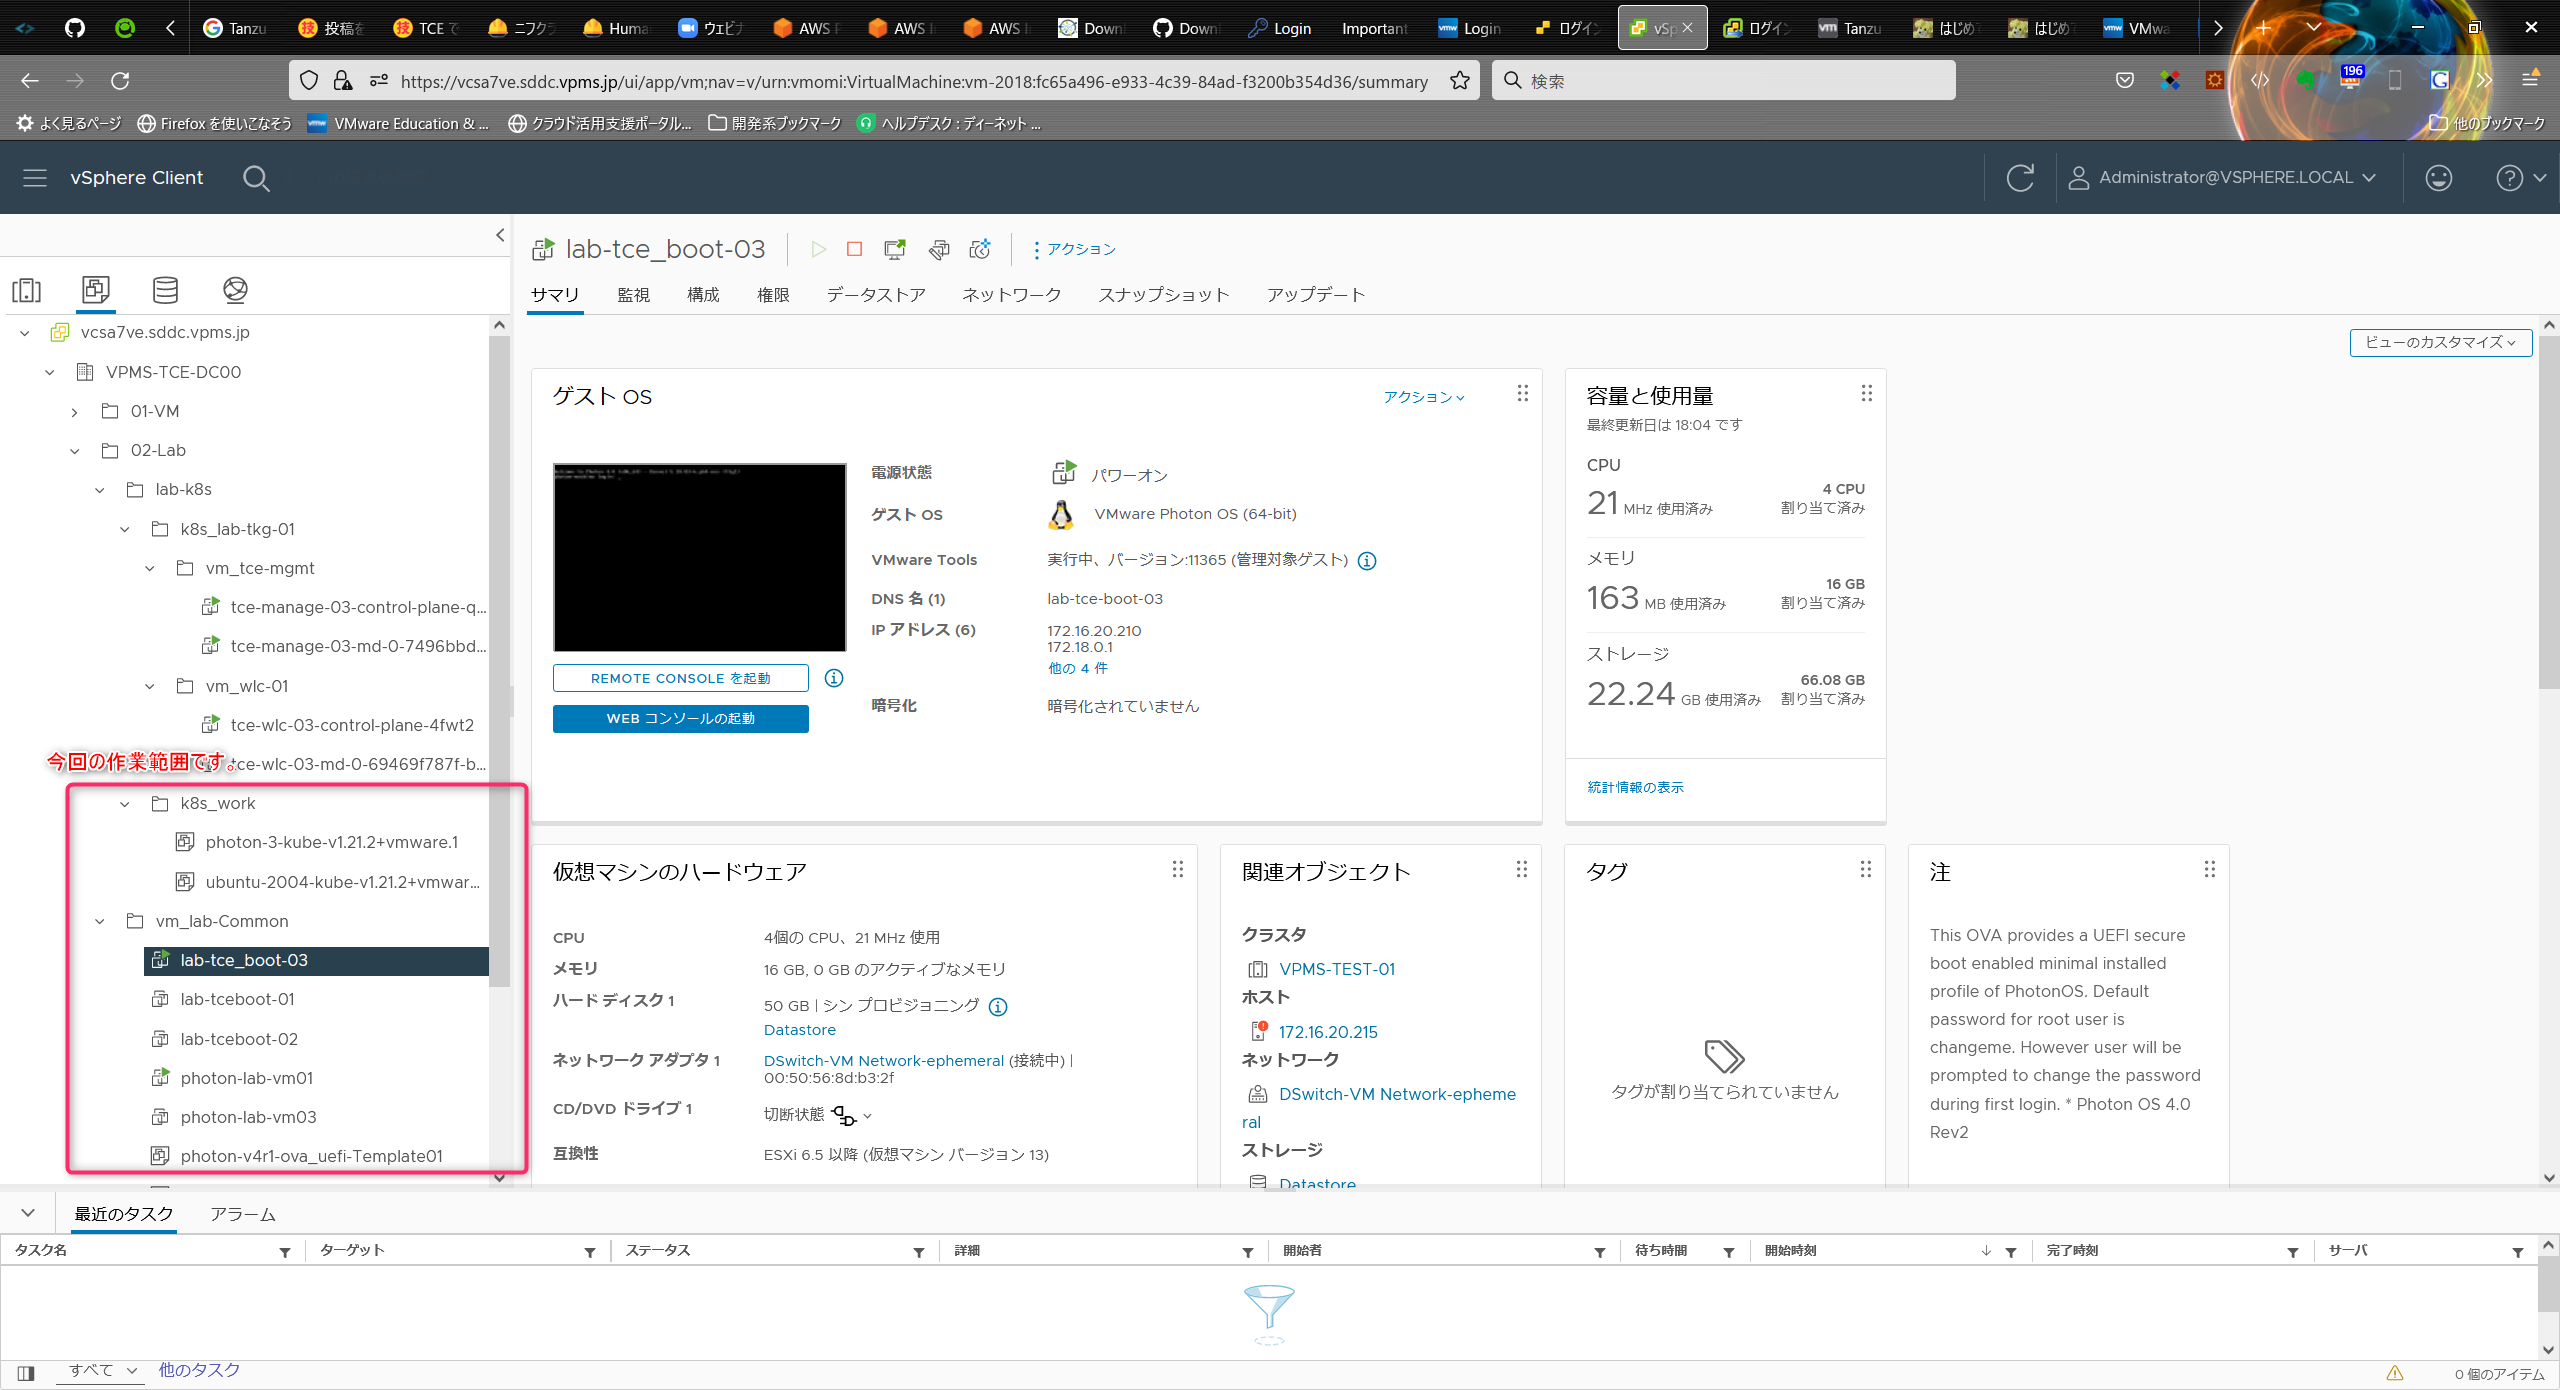
仮想マシン名:lab-tceboot-03
デプロイしたら、vCPU を 4、メモリを 16GB(要件は 6GB ですが、ここでは大きめに)に設定変更して起動
CPU: 4vCPU
MEM: 16GB
Disk: 50GB(デフォルト:16GB -> 50GB)
Network adapter: DSwitch-VM Network-ephemeral
CD/DVD drive 1: クライアント デバイス(※便宜上)
- デプロイ後、ネットワーク設定 (固定 IP アドレスの付与)や OS のアップデートを実施
- 一般ユーザ (denet) の作成
- iptables によるファイアウォールが有効になりますが、今回は検証環境なので無効にしておきます。
- パーティション拡張(16GB -> 50GB へ適用)
- docker の起動および自動起動設定
- OS 設定の調整(キーボードマップ、タイムゾーン、ホスト名の設定など)
ここまでは、OS の基本設定などの事前準備となります。
※これより以降の作業は、一般ユーザー denet にて実施となります。
$ su - denet
$ id
- ssh-keygen で、SSH 鍵ペアのファイルを作成
$ ssh-keygen -P '' -f ~/.ssh/id_rsa
$ ls -l .ssh/
$ cat .ssh/id_rsa.pub
※以降の作業に公開鍵が必要になりますので、準備をしておきます。
- CLI を配置するディレクトリ($HOME/bin)を作成して、PATH 環境変数に追加設定
$ mkdir $HOME/bin
$ echo 'PATH=$HOME/bin:$PATH' >> $HOME/.bash_profile
$ source $HOME/.bash_profile
$ cat $HOME/.bash_profile
- 次回ログイン時に tanzu CLI と kubectl の Bash 補完機能を有効化
$ echo 'source <(tanzu completion bash)' >> $HOME/.bash_profile
$ echo 'source <(kubectl completion bash)' >> $HOME/.bash_profile
kubectl のインストール
- 最新の kubectl をダウンロードし、インストールします。
cd $HOME/bin/
curl -LO "https://dl.k8s.io/release/$(curl -L -s https://dl.k8s.io/release/stable.txt)/bin/linux/amd64/kubectl"
chmod +x $HOME/bin/kubectl
kubectl version --short --client
denet [ ~ ]$ cd $HOME/bin/
denet [ ~/bin ]$ curl -LO "https://dl.k8s.io/release/$(curl -L -s https://dl.k8s.io/release/stable.txt)/bin/linux/amd64/kubectl"
% Total % Received % Xferd Average Speed Time Time Time Current
Dload Upload Total Spent Left Speed
100 154 100 154 0 0 376 0 --:--:-- --:--:-- --:--:-- 377
100 44.4M 100 44.4M 0 0 9353k 0 0:00:04 0:00:04 --:--:-- 10.5M
denet [ ~/bin ]$
denet [ ~/bin ]$ chmod +x $HOME/bin/kubectl
denet [ ~/bin ]$
denet [ ~/bin ]$ kubectl version --short --client
Client Version: v1.23.2
Tanzu Community Edition のインストール
- TCE を GitHub からダウンロードします。
https://github.com/vmware-tanzu/community-edition/releases
$ cd
$ curl -sLO https://github.com/vmware-tanzu/community-edition/releases/download/v0.10.0-rc.2/tce-linux-amd64-v0.10.0-rc.2.tar.gz
※最新は RC 版ですが、ここではこちらを導入してみます。
- ファイルを展開します。
$ tar zxvf tce-linux-amd64-v0.10.0-rc.2.tar.gz
denet [ ~ ]$ tar zxvf tce-linux-amd64-v0.10.0-rc.2.tar.gz
tce-linux-amd64-v0.10.0-rc.2/
tce-linux-amd64-v0.10.0-rc.2/bin/
tce-linux-amd64-v0.10.0-rc.2/bin/tanzu
tce-linux-amd64-v0.10.0-rc.2/bin/tanzu-plugin-cluster
tce-linux-amd64-v0.10.0-rc.2/bin/tanzu-plugin-kubernetes-release
tce-linux-amd64-v0.10.0-rc.2/bin/tanzu-plugin-login
tce-linux-amd64-v0.10.0-rc.2/bin/tanzu-plugin-secret
tce-linux-amd64-v0.10.0-rc.2/bin/tanzu-plugin-package
tce-linux-amd64-v0.10.0-rc.2/bin/tanzu-plugin-pinniped-auth
tce-linux-amd64-v0.10.0-rc.2/bin/tanzu-plugin-management-cluster
tce-linux-amd64-v0.10.0-rc.2/bin/tanzu-plugin-builder
tce-linux-amd64-v0.10.0-rc.2/bin/tanzu-plugin-codegen
tce-linux-amd64-v0.10.0-rc.2/bin/tanzu-plugin-standalone-cluster
tce-linux-amd64-v0.10.0-rc.2/bin/tanzu-plugin-conformance
tce-linux-amd64-v0.10.0-rc.2/bin/tanzu-plugin-diagnostics
tce-linux-amd64-v0.10.0-rc.2/install.sh
tce-linux-amd64-v0.10.0-rc.2/uninstall.sh
- インストール スクリプトを実行
$ cd tce-linux-amd64-v0.10.0-rc.2/
$ ./install.sh
denet [ ~/tce-linux-amd64-v0.10.0-rc.2 ]$ ./install.sh
+ ALLOW_INSTALL_AS_ROOT=
+ [[ 1000 -eq 0 ]]
+++ dirname ./install.sh
++ cd .
++ pwd
+ MY_DIR=/home/denet/tce-linux-amd64-v0.10.0-rc.2
++ uname
+ BUILD_OS=Linux
+ case "${BUILD_OS}" in
+ XDG_DATA_HOME=/home/denet/.local/share
+ echo /home/denet/.local/share
/home/denet/.local/share
++ command -v tanzu
+ TANZU_BIN_PATH=
+ [[ -n '' ]]
+ TANZU_BIN_PATH=/usr/local/bin
+ [[ :/home/denet/bin:/home/denet/bin:/usr/local/bin:/bin:/usr/bin: == *\:\/\h\o\m\e\/\d\e\n\e\t\/\b\i\n\:* ]]
+ [[ -d /home/denet/bin ]]
+ TANZU_BIN_PATH=/home/denet/bin
+ echo Installing tanzu cli to /home/denet/bin
Installing tanzu cli to /home/denet/bin
+ install /home/denet/tce-linux-amd64-v0.10.0-rc.2/bin/tanzu /home/denet/bin
+ mkdir -p /home/denet/.local/share/tanzu-cli
+ for plugin in "${MY_DIR}"/bin/tanzu-plugin*
+ install /home/denet/tce-linux-amd64-v0.10.0-rc.2/bin/tanzu-plugin-builder /home/denet/.local/share/tanzu-cli
+ for plugin in "${MY_DIR}"/bin/tanzu-plugin*
+ install /home/denet/tce-linux-amd64-v0.10.0-rc.2/bin/tanzu-plugin-cluster /home/denet/.local/share/tanzu-cli
+ for plugin in "${MY_DIR}"/bin/tanzu-plugin*
+ install /home/denet/tce-linux-amd64-v0.10.0-rc.2/bin/tanzu-plugin-codegen /home/denet/.local/share/tanzu-cli
+ for plugin in "${MY_DIR}"/bin/tanzu-plugin*
+ install /home/denet/tce-linux-amd64-v0.10.0-rc.2/bin/tanzu-plugin-conformance /home/denet/.local/share/tanzu-cli
+ for plugin in "${MY_DIR}"/bin/tanzu-plugin*
+ install /home/denet/tce-linux-amd64-v0.10.0-rc.2/bin/tanzu-plugin-diagnostics /home/denet/.local/share/tanzu-cli
+ for plugin in "${MY_DIR}"/bin/tanzu-plugin*
+ install /home/denet/tce-linux-amd64-v0.10.0-rc.2/bin/tanzu-plugin-kubernetes-release /home/denet/.local/share/tanzu-cli
+ for plugin in "${MY_DIR}"/bin/tanzu-plugin*
+ install /home/denet/tce-linux-amd64-v0.10.0-rc.2/bin/tanzu-plugin-login /home/denet/.local/share/tanzu-cli
+ for plugin in "${MY_DIR}"/bin/tanzu-plugin*
+ install /home/denet/tce-linux-amd64-v0.10.0-rc.2/bin/tanzu-plugin-management-cluster /home/denet/.local/share/tanzu-cli
+ for plugin in "${MY_DIR}"/bin/tanzu-plugin*
+ install /home/denet/tce-linux-amd64-v0.10.0-rc.2/bin/tanzu-plugin-package /home/denet/.local/share/tanzu-cli
+ for plugin in "${MY_DIR}"/bin/tanzu-plugin*
+ install /home/denet/tce-linux-amd64-v0.10.0-rc.2/bin/tanzu-plugin-pinniped-auth /home/denet/.local/share/tanzu-cli
+ for plugin in "${MY_DIR}"/bin/tanzu-plugin*
+ install /home/denet/tce-linux-amd64-v0.10.0-rc.2/bin/tanzu-plugin-secret /home/denet/.local/share/tanzu-cli
+ for plugin in "${MY_DIR}"/bin/tanzu-plugin*
+ install /home/denet/tce-linux-amd64-v0.10.0-rc.2/bin/tanzu-plugin-standalone-cluster /home/denet/.local/share/tanzu-cli
+ mkdir -p /home/denet/.local/share/tce
+ install /home/denet/tce-linux-amd64-v0.10.0-rc.2/uninstall.sh /home/denet/.local/share/tce
+ TANZU_PLUGIN_CACHE=/home/denet/.cache/tanzu/catalog.yaml
+ [[ -n /home/denet/.cache/tanzu/catalog.yaml ]]
+ echo 'Removing old plugin cache from /home/denet/.cache/tanzu/catalog.yaml'
Removing old plugin cache from /home/denet/.cache/tanzu/catalog.yaml
+ rm -f /home/denet/.cache/tanzu/catalog.yaml
+ tanzu init
| initializing ?  successfully initialized CLI
++ tanzu plugin repo list
++ grep tce
+ TCE_REPO=
+ [[ -z '' ]]
+ tanzu plugin repo add --name tce --gcp-bucket-name tce-tanzu-cli-plugins --gcp-root-path artifacts
++ tanzu plugin repo list
++ grep core-admin
+ TCE_REPO=
+ [[ -z '' ]]
+ tanzu plugin repo add --name core-admin --gcp-bucket-name tce-tanzu-cli-framework-admin --gcp-root-path artifacts-admin
+ echo 'Installation complete!'
Installation complete!
- tanzu CLI が実行可能になったことを確認
$ cd
$ which tanzu
$ tanzu version
denet [ ~ ]$ which tanzu
/home/denet/bin/tanzu
denet [ ~ ]$
denet [ ~ ]$ tanzu version
version: v0.10.0
buildDate: 2021-12-03
sha: fd96beb
OVA テンプレートのデプロイ
TCE で使用する OVA ファイルをデプロイし、テンプレートに変換しておきます。
OVA ファイルは、下記からダウンロードします。
https://customerconnect.vmware.com/downloads/get-download?downloadGroup=TCE-090
今回は photon-3-kube-v1.21.2+vmware.1-tkg.2-12816990095845873721.ova を利用します。
※vCenter 側でデプロイ作業をします。
※このデプロイは、ここより前の任意のタイミングで行っておけば良いでしょう。
これで TCE 環境の下準備が完了なります。
本日は、ここまでとします。
最後に
今回は、TCE 環境を構築するにあたって、必要となる下準備を紹介しました。
次回からは、TCE 環境の構築を本格的に進めます。
-
Management Cluster の作成
-
WorkloadCluster の作成
の予定をしています。
それでは、この辺で失礼します。
