
目次
はじめに
どうもポテトはカリカリ派の男、超川です。
「機械学習や生成AIの開発って、専門知識やPythonが必要なんでしょ…?」
そう思っている方にこそ試してほしいのが Amazon SageMaker JumpStart
クリックのポチポチ操作だけで事前学習済みAIモデルを簡単に試すことができます!
コーディングが苦手でも、「画像生成・感情分析・画像認識」などのAIをサクッと体験できます。
今回は、SageMaker JumpStartを使って画像生成AIを作成する、超シンプルなハンズオンをご紹介します。
SageMaker JumpStartとは?
まずはSageMaker JumpStartについてざっくり紹介します。
SageMaker JumpStartとは、AWSが提供する機械学習モデルのテンプレート集です。
600 を超える事前学習済みモデルが用意されており、コードを書かずにモデルのデプロイや推論ができます。

実際にやってみる
もっともっとSageMaker JumpStartの特徴や魅力はありますが、今回は尺の都合上ここまでにして...
さっそく実際にハンズオンを行っていきましょう!!
ステップ1:SageMaker Studioへアクセス
1-1.今すぐ始めるからSagemakerドメインの作成をクリック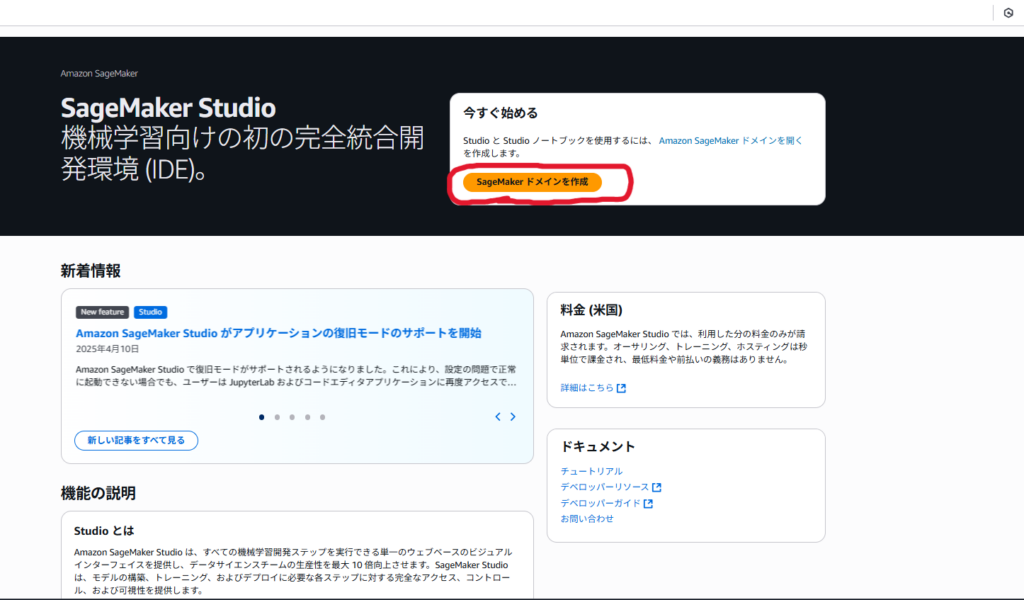
1-2.シングルユーザ向けの設定(クイックセットアップ)を選択し、設定をクリック。
しばらくすると「SageMaker Domainの準備ができました」と表示されます。
1-3.準備ができたら、先ほど作成したドメインを選択して「Studio を開く」をクリック
(ユーザプロファイルは今回はデフォルトを使用しています)

ステップ2:モデルを選択してエンドポイントをデプロイ
2-1.左メニューから「JumpStart」をクリック。
今回は「Stable Diffusion」を使用します。
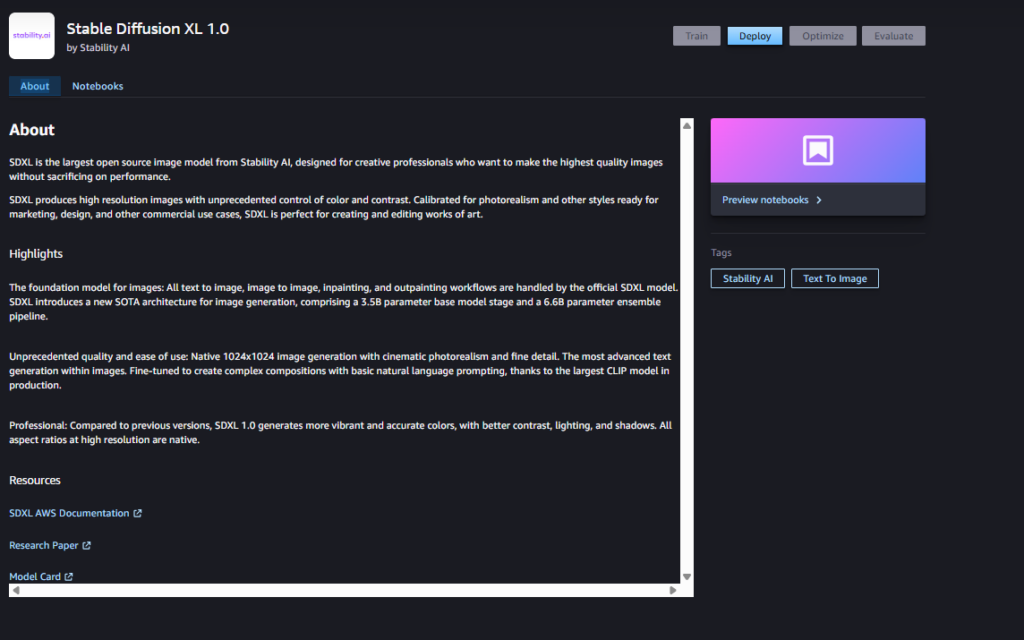
2-2.「Deploy」ボタンをクリック。
今回使用する「Stable Diffusion XL 1.0」はAWSマーケットプレイスのサブスクリプションが必要です。
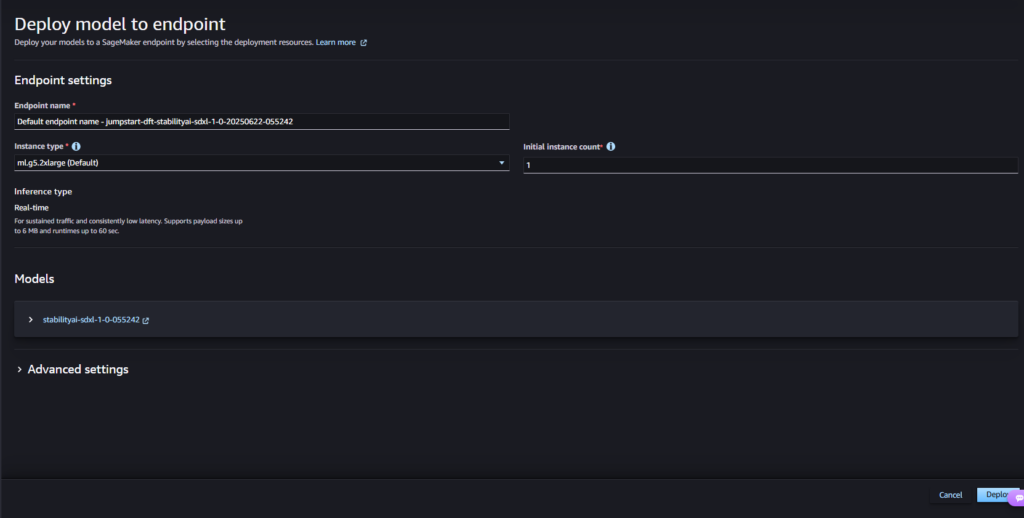
2-3.エンドポイント、インスタンスタイプ、インスタンス数を選びます。
通常は「インスタンス数: 1」で十分です。(複数は高可用性用)
数分待てば、エンドポイントがデプロイされました!
ハンズオン時に発生したエラー
今回、「ml.g5.2xlarge」があなたのアカウントでは使えない設定になっているというエラーが発生しました。
これは新規AWSアカウントでよく発生する問題だそうです。
①AWSのコンパネから「Service Quotas」に移動
↓
②AWSのサービスから「Amazon SageMaker」を選択
↓
②「ml.g5.2xlarge for endpoint usage」にチェックを入れて
クォータ引き上げをリクエスト(Request quota increase)」をクリックで解決
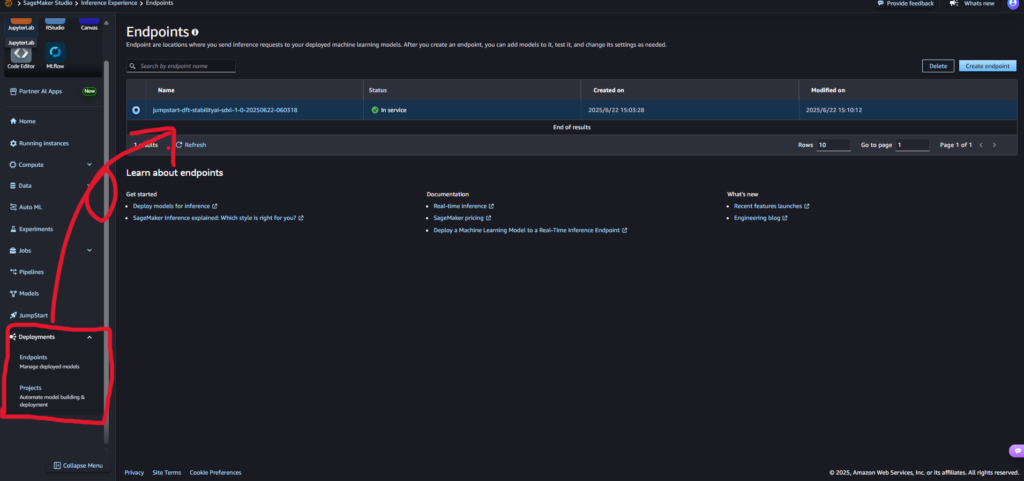
ステップ3:実際に動かしてみる
今回は簡単、簡潔に作成した生成AIをチャット風UIとして動かすために
Python SDKを使用します。
3-1.左カラムの「Deployments」タブの「Endpoints」から今回作成したエンドポイントをクリック
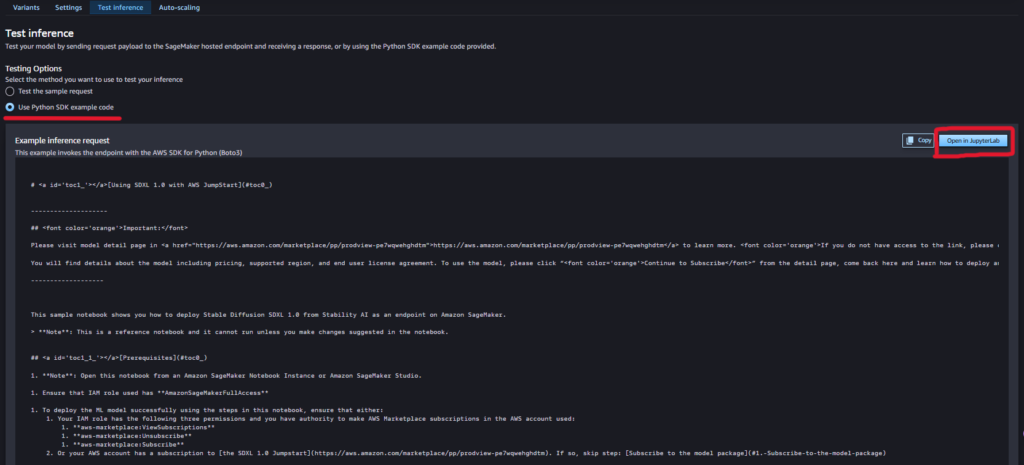
3-2.「Test inference」タブに移動。
3-3.「Use Python SDK example code」 を選択し、「Open in JupyterLab」 をクリックします。
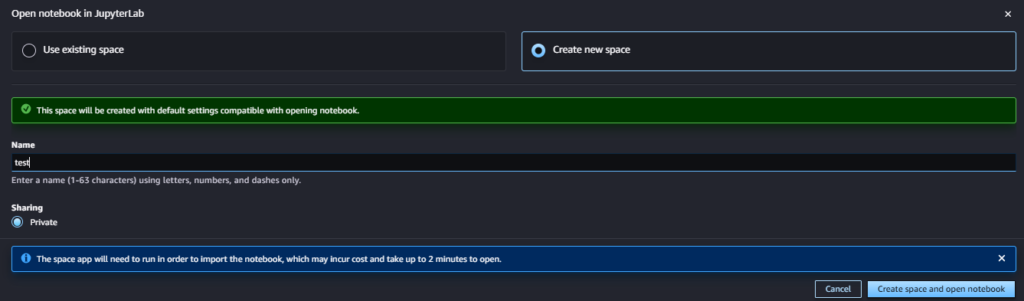
3-4.「Create new space」を選択して名前を入力。(今回はtestで作成)
右下の「Create space and Open notebook」をクリックして作成。
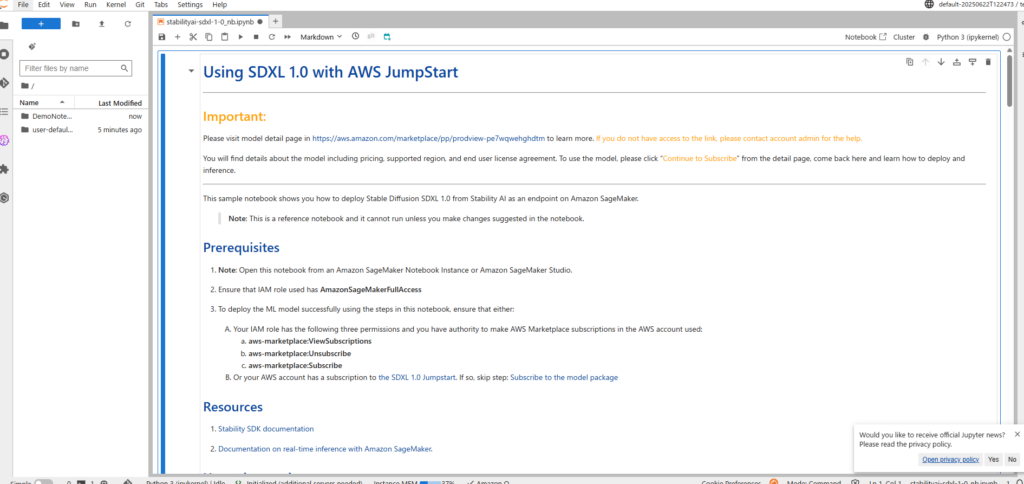
3-5.作成後、「Open in JupyterLab」から「Use existing space」を選択し、
先ほど作成したものをクリックするとJupyterLabのノートブックが開きます。
3-6.「+」ボタンで新しいセル作成し、
チャット風UIを作成するためのコードを貼り付け、Shift + Enter で実行
偉大なるChatGPT大先生に書いてもらったコード↓
# 必要なライブラリの自動インストール
import subprocess
import sys

def install_package(package):
    """パッケージを自動インストールする関数"""
    try:
        __import__(package)
        print(f"{package} is already installed.")
    except ImportError:
        print(f"Installing {package}...")
        subprocess.check_call([sys.executable, "-m", "pip", "install", package])
        print(f"{package} installed successfully.")

# 必要なライブラリをインストール
install_package("gradio")

# ライブラリのインポート
import gradio as gr
import boto3
import json
import base64
from PIL import Image
import io

# あなたのエンドポイント名を入力してください
ENDPOINT_NAME = "your-endpoint-name-here"

# SageMaker Runtime クライアント
runtime = boto3.client('sagemaker-runtime')

def generate_image(prompt, negative_prompt="low quality, blurry", steps=25, guidance=7.5):
    """画像生成関数"""
    try:
        # Stable Diffusion SDXL用のペイロード形式
        payload = {
            "text_prompts": [
                {
                    "text": prompt,
                    "weight": 1.0
                }
            ],
            "cfg_scale": float(guidance),
            "steps": int(steps),
            "seed": 0,
            "width": 1024,
            "height": 1024,
            "samples": 1
        }

        # ネガティブプロンプトがある場合
        if negative_prompt and negative_prompt.strip():
            payload["text_prompts"].append({
                "text": negative_prompt,
                "weight": -1.0
            })

        print(f"送信データ: {json.dumps(payload, indent=2)}")

        # SageMaker エンドポイントに推論リクエスト
        response = runtime.invoke_endpoint(
            EndpointName=ENDPOINT_NAME,
            ContentType='application/json',
            Body=json.dumps(payload)
        )

        # レスポンスを解析
        result = json.loads(response['Body'].read().decode())
        print("レスポンス受信完了")
        print(f"利用可能なキー: {list(result.keys())}")

        # 画像データを処理(複数パターンに対応)
        image_data = None

        if 'artifacts' in result and len(result['artifacts']) > 0:
            # Stability AI形式
            print("Stability AI形式で画像データを検出")
            image_data = base64.b64decode(result['artifacts'][0]['base64'])

        elif 'images' in result and len(result['images']) > 0:
            # 別の形式
            print("images形式で画像データを検出")
            image_data = base64.b64decode(result['images'][0])

        elif 'generated_images' in result and len(result['generated_images']) > 0:
            # JumpStart形式
            print("generated_images形式で画像データを検出")
            image_data = base64.b64decode(result['generated_images'][0])

        else:
            # レスポンス内容をデバッグ表示
            print(f"予期しないレスポンス形式")
            print(f"レスポンス内容: {result}")
            return f"レスポンス形式が不明です。利用可能なキー: {list(result.keys())}"

        # 画像を作成して返す
        if image_data:
            image = Image.open(io.BytesIO(image_data))
            print("画像生成成功!")
            return image
        else:
            return "画像データが見つかりませんでした"

    except Exception as e:
        print(f"エラー詳細: {e}")
        return f"エラーが発生しました: {str(e)}"

def generate_image_debug(prompt, negative_prompt="", steps=25, guidance=7.5):
    """デバッグ用の簡単版"""
    try:
        # 最もシンプルな形式でテスト
        payload = {"prompt": prompt}

        print(f"デバッグモード - 送信データ: {payload}")

        response = runtime.invoke_endpoint(
            EndpointName=ENDPOINT_NAME,
            ContentType='application/json',
            Body=json.dumps(payload)
        )

        result = json.loads(response['Body'].read().decode())
        print(f"受信したキー: {list(result.keys())}")
        print(f"レスポンス内容(最初の300文字): {str(result)[:300]}...")

        return f"デバッグ完了。コンソールを確認してください。キー: {list(result.keys())}"

    except Exception as e:
        print(f"デバッグエラー: {e}")
        return f"デバッグエラー: {str(e)}"

def check_endpoint_connection():
    """エンドポイント接続確認"""
    try:
        if ENDPOINT_NAME == "your-endpoint-name-here":
            return "ERROR: Please set your actual endpoint name in ENDPOINT_NAME variable"

        # エンドポイント一覧を取得
        sagemaker = boto3.client('sagemaker')
        endpoints = sagemaker.list_endpoints()

        endpoint_names = [ep['EndpointName'] for ep in endpoints['Endpoints']]

        if ENDPOINT_NAME in endpoint_names:
            return f"SUCCESS: Endpoint '{ENDPOINT_NAME}' found and ready to use"
        else:
            available_endpoints = ", ".join(endpoint_names) if endpoint_names else "No endpoints found"
            return f"ERROR: Endpoint '{ENDPOINT_NAME}' not found. Available endpoints: {available_endpoints}"

    except Exception as e:
        return f"ERROR: Failed to check endpoints: {str(e)}"

# 初期設定の確認
print("=" * 60)
print("AI Image Generation Chat UI Setup")
print("=" * 60)
print("Checking endpoint connection...")
connection_status = check_endpoint_connection()
print(connection_status)
print("=" * 60)

# Gradio チャットインターフェース
with gr.Blocks(title="AI Image Generation Chat", theme=gr.themes.Soft()) as demo:

    gr.Markdown("# AI Image Generation Chat")
    gr.Markdown("**Enter a prompt to generate images with AI!**")

    # エンドポイント状態表示
    gr.Markdown(f"**Endpoint Status:** `{connection_status}`")

    with gr.Row():
        with gr.Column(scale=1):
            # 入力エリア
            prompt_input = gr.Textbox(
                label="What would you like to create?",
                placeholder="Example: a beautiful sunset over mountains",
                lines=3,
                value="a cute cat sitting in a sunny garden"
            )

            negative_prompt = gr.Textbox(
                label="Negative Prompt (what to avoid)",
                placeholder="Example: blurry, low quality, dark",
                lines=1,
                value="low quality, blurry"
            )

            # パラメータ調整
            with gr.Row():
                steps_slider = gr.Slider(
                    minimum=10, maximum=50, value=25, step=1,
                    label="Steps (Quality)"
                )
                guidance_slider = gr.Slider(
                    minimum=1, maximum=20, value=7.5, step=0.5,
                    label="Guidance Scale (Prompt Adherence)"
                )

            # 生成ボタン(2種類)
            with gr.Row():
                generate_btn = gr.Button("Generate Image", variant="primary")
                debug_btn = gr.Button("Debug Mode", variant="secondary")

            # サンプルプロンプト
            gr.Markdown("### Sample Prompts")
            sample_buttons = [
                "a majestic dragon flying over a castle",
                "cyberpunk city with neon lights",
                "peaceful Japanese garden with cherry blossoms",
                "futuristic spaceship in deep space",
                "portrait of a wise old wizard"
            ]

            for sample in sample_buttons:
                sample_btn = gr.Button(f"{sample}", size="sm")
                sample_btn.click(lambda x=sample: x, outputs=prompt_input)

        with gr.Column(scale=1):
            # 画像表示エリア
            output_image = gr.Image(
                label="Generated Image",
                height=600,
                show_download_button=True
            )

            # ステータス表示
            status_text = gr.Textbox(
                label="Status",
                value="Ready to generate images!" if "SUCCESS" in connection_status else "Please check endpoint configuration",
                interactive=False,
                lines=3
            )

    # 設定情報表示
    gr.Markdown("### Configuration")
    gr.Markdown(f"**Current Endpoint:** `{ENDPOINT_NAME}`")
    gr.Markdown("**To change endpoint:** Modify the `ENDPOINT_NAME` variable at the top of the code")

    # イベント処理
    def update_status(prompt):
        return f"Generating: '{prompt[:50]}...' Please wait..."

    def update_debug_status(prompt):
        return f"Debug mode: '{prompt[:50]}...' Check console for details..."

    # 通常の生成ボタン
    generate_btn.click(
        fn=update_status,
        inputs=prompt_input,
        outputs=status_text
    ).then(
        fn=generate_image,
        inputs=[prompt_input, negative_prompt, steps_slider, guidance_slider],
        outputs=output_image
    ).then(
        fn=lambda: "Generation complete! You can generate new images.",
        outputs=status_text
    )

    # デバッグボタン
    debug_btn.click(
        fn=update_debug_status,
        inputs=prompt_input,
        outputs=status_text
    ).then(
        fn=generate_image_debug,
        inputs=[prompt_input, negative_prompt, steps_slider, guidance_slider],
        outputs=status_text
    )

# インターフェース起動
print("Starting AI Image Generation Chat UI...")
demo.launch(
    share=True,           # 外部アクセス可能なURLを生成
    server_name="0.0.0.0", # すべてのIPからアクセス可能
    show_error=True,      # エラー詳細を表示
    debug=True            # デバッグモード有効
)
チャット風UIが完成したのでさっそく試してみよ~
今回は日本語での質問に対応させていないので英語で質問。
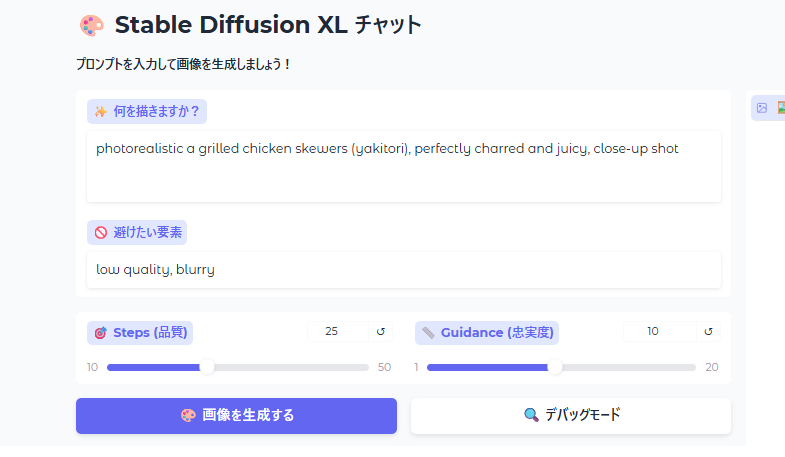
↓「まるで写真みたいな焼き鳥のイラストを描いてください」と依頼してみた。

おぉ~
なんか串の刺さり方がおかし気もするが...
かなりリアルな画像が作成されましたので大成功としましょう!!
【重要】エンドポイント削除を忘れずに!
SageMakerのエンドポイントは稼働中は料金が発生し続けるため、
継続課金を避けるため、テスト終了後は必ずエンドポイントを削除しましょう!!
【ml.g5.2xlargeだと、約$1.5/時間(約200円/時間)】
Amazon SageMakerのAWSマーケットプレイスのサブスクリプションは従量課金制なので
キャンセルしなくても料金はかかりません。
さいごに
今回のお話はいかがだったでしょうか。
気になった方はぜひSageMaker JumpStartで
画像生成AIを体験してみてくださいね!
それじゃあ、また~
半年前までCtrl+Cもわからなかった男